
制作自定义开发机镜像
更新时间:2025-05-22
在使用自定义镜像创建开发机时,首先需要打包开发机镜像,然后使用自定义镜像创建开发机实例。
镜像要求
自定义镜像需要满足以下要求才能正常使用WebIDE和SSH服务:
- 如果需要使用WebIDE必须确保自定义镜像能够启动Jupyter服务,支持JupyterLab和JupyterNotebook(推荐使用JupyterLab)
- 如果需要启用SSH服务,确保自定义镜像能够启动SSH服务(推荐使用证书密钥方式认证)
结合以上要求,以下给出了开发机的Dockerfile及依赖文件示例,用户可参考示例按需修改为自己的开发机
镜像打包示例
推荐使用以下打包示例,仅在Dockerfile中根据需要修改基础镜像、预安装软件包等信息后打包自定义镜像
说明:
- 示例中使用的Jupyter服务容器端口为8600,SSH服务容器端口为22,可以根据实际修改
- 启动脚本中的可以自定义或随机生成JUPYTER_TOKEN,随机token使用
JUPYTER_TOKEN=${JUPYTER_TOKEN:-$(pwgen -B -s 32 1)},指定token使用JUPYTER_TOKEN=${JUPYTER_TOKEN:"token-xxxxxxxxxxxxx"} - 自定义修改时,配置文件(jupyter_lab_config.py、jupyter_notebook_config.py)和启动脚本中的JUPYTERLAB_BASE_URL是必须设置的,启动开发机时平台会在自动注入
JUPYTERLAB_BASE_URL作为访问Jupyter的路径
JupyterLab
JupyterLab是Jupyter的主流版本,推荐使用JupyterLab作为WebIDE
- 目录结构,在打包机器上创建如下目录及文件
Bash
1--dev-demo
2  --jupyter_lab_config.py //Jupyter Lab的config文件
3  --Dockerfile
4 --enterpoint.sh // 启动脚本文件- JupyterLab配置文件
Python
1import os
2c = get_config()  #noqa
3c.ServerApp.allow_remote_access = True
4c.ServerApp.allow_root = True
5c.ServerApp.base_url = '/jupyter'
6c.ServerApp.ip = '0.0.0.0'
7c.ServerApp.open_browser = False
8c.ServerApp.port = 8600
9c.ServerApp.root_dir = '/root'
10c.ServerApp.terminado_settings = {'shell_command' : ['/bin/bash']}
11c.ServerApp.base_url = os.environ.get("JUPYTERLAB_BASE_URL", "/jupyter")- 启动命令脚本
Bash
1#!/bin/bash
2# start sshd
3sudo service ssh restart
4
5# start jupyterlab
6# 随机生成JUPYTER_TOKEN,需要用户替换成自己想要设置的token,在登录时会用到
7# JUPYTER_TOKEN=${JUPYTER_TOKEN:-$(pwgen -B -s 32 1)}
8JUPYTER_TOKEN=${JUPYTER_TOKEN:"token-xxxxxxxxxxxxx"}
9export JUPYTERLAB_BASE_URL=${JUPYTERLAB_BASE_URL:-"/jupyter"}
10export JUPYTER_PORT=${JUPYTER_PORT:-8600}
11mkdir -p /root/.jupyter
12nohup jupyter-lab --IdentityProvider.token="$JUPYTER_TOKEN" >/root/.jupyter/jupyter.log 2>&1 &
13if [ $? -ne 0 ];then
14    exit 1
15fi
16
17# block
18while true; do
19    sleep 60
20done- Dockerfile文件
Bash
1# 可以替换成自己的基础镜像
2FROM nvcr.io/nvidia/pytorch:24.02-py3
3
4WORKDIR /root
5
6# set ENV VARS
7ENV TZ=Asia/Shanghai
8ENV NVIDIA_REQUIRE_CUDA=cuda>=9.0
9ENV NVIDIA_VISIBLE_DEVICES=""
10ENV JUPYTER_PORT=8600
11ENV JUPYTERLAB_BASE_URL=/jupyter
12
13COPY ./enterpoint.sh /root/.install/enterpoint.sh
14COPY ./jupyter_lab_config.py /root/.jupyter/jupyter_lab_config.py
15
16# 设置时区
17RUN ln -snf /usr/share/zoneinfo/$TZ /etc/localtime && echo $TZ > /etc/timezone
18
19# 安装系统工具
20ARG DEBIAN_FRONTEND=noninteractive
21RUN apt-get update && apt-get upgrade -y &&     apt-get install -y openssh-server &&     mkdir -p /var/run/sshd &&     apt-get install -y --no-install-recommends cron python3-venv pwgen bc curl wget vim git cron
22
23# 安装python包
24RUN pip install jupyterlab -i https://pypi.tuna.tsinghua.edu.cn/simple && pip install jupyterlab-language-pack-zh-CN -i https://pypi.tuna.tsinghua.edu.cn/simple && pip install jupytext -i https://pypi.tuna.tsinghua.edu.cn/simple
25
26# 安装nodejs
27RUN curl -fsSL https://deb.nodesource.com/setup_16.x | sudo -E bash - &&     sudo apt-get install -y nodejs
28
29# install anaconda3
30SHELL ["/bin/bash", "-c"]
31
32RUN chmod +x /root/.install/enterpoint.sh
33
34# ports of SSH and jupyter
35EXPOSE 22 8600
JupyterNotebook
目录结构
Bash
1--dev-demo
2  --enterpoint.sh // 启动脚本文件
3  --jupyter_notebook_config.py //jupyter的config文件
4  --Dockerfile
启动命令脚本
Bash
1#!/bin/bash
2
3# start sshd
4sudo service ssh restart
5
6# jupyterlab
7JUPYTER_TOKEN=${JUPYTER_TOKEN:-$(pwgen -B -s 32 1)}
8export JUPYTERLAB_BASE_URL=${JUPYTERLAB_BASE_URL:-"/jupyter"}
9export JUPYTER_PORT=${JUPYTER_PORT:-8600}
10mkdir -p /root/.jupyter
11nohup jupyter-lab --IdentityProvider.token="$JUPYTER_TOKEN"
12nohup jupyter-lab --NotebookApp.token="$JUPYTER_TOKEN"="$JUPYTER_TOKEN"
13>/root/.jupyter/jupyter.log 2>&1 &
14if [ $? -ne 0 ];then
15    exit 1
16fi
17
18# block
19while true; do
20    sleep 60
21done
JupyterNotebook配置文件
Python
1import os
2c = get_config()
3c.NotebookApp.allow_remote_access = True
4c.NotebookApp.allow_root = True
5c.NotebookApp.terminado_settings = {'shell_command' : ['/bin/bash']}
6c.LabApp.base_url = os.environ.get("JUPYTERLAB_BASE_URL", "/jupyter")
7c.LabApp.ip = '0.0.0.0'
8c.LabApp.port = 8600
9c.LabApp.terminado_settings = {'shell_command' : ['/bin/bash']}
Dockerfile文件
Bash
1# 可以替换成自己的基础镜像
2FROM nvcr.io/nvidia/pytorch:24.02-py3
3
4WORKDIR /root
5
6# set ENV VARS
7ENV TZ=Asia/Shanghai
8ENV NVIDIA_REQUIRE_CUDA=cuda>=9.0
9ENV NVIDIA_VISIBLE_DEVICES=""
10ENV JUPYTER_PORT=8600
11ENV JUPYTERLAB_BASE_URL=/jupyter
12
13COPY ./enterpoint.sh /root/.install/enterpoint.sh
14COPY ./condarc /root/.condarc
15COPY ./jupyter_notebook_config.py /root/.jupyter/jupyter_notebook_config.py
16
17# 设置时区
18RUN ln -snf /usr/share/zoneinfo/$TZ /etc/localtime && echo $TZ > /etc/timezone
19
20# 安装系统工具
21ARG DEBIAN_FRONTEND=noninteractive
22RUN apt-get update && apt-get upgrade -y &&     apt-get install -y openssh-server &&     mkdir -p /var/run/sshd &&     apt-get install -y --no-install-recommends cron python3-venv pwgen bc curl wget vim git cron
23
24# 安装python包
25RUN pip install jupyterlab -i https://pypi.tuna.tsinghua.edu.cn/simple &&     pip install jupyterlab-language-pack-zh-CN -i https://pypi.tuna.tsinghua.edu.cn/simple &&     pip install jupytext -i https://pypi.tuna.tsinghua.edu.cn/simple
26
27# 安装nodejs
28RUN curl -fsSL https://deb.nodesource.com/setup_16.x | sudo -E bash - &&     sudo apt-get install -y nodejs
29
30# install anaconda3
31SHELL ["/bin/bash", "-c"]
32
33RUN chmod +x /root/.install/enterpoint.sh
34
35# ports of SSH and jupyter
36EXPOSE 22 8600
自定义镜像创建开发机
按上述步骤打包好镜像后,需将镜像上传到CCR镜像仓库,然后按如下步骤创建开发机。
- 填写自定义镜像地址或从用户自己的CCR镜像仓库中选择以及设置启动命令
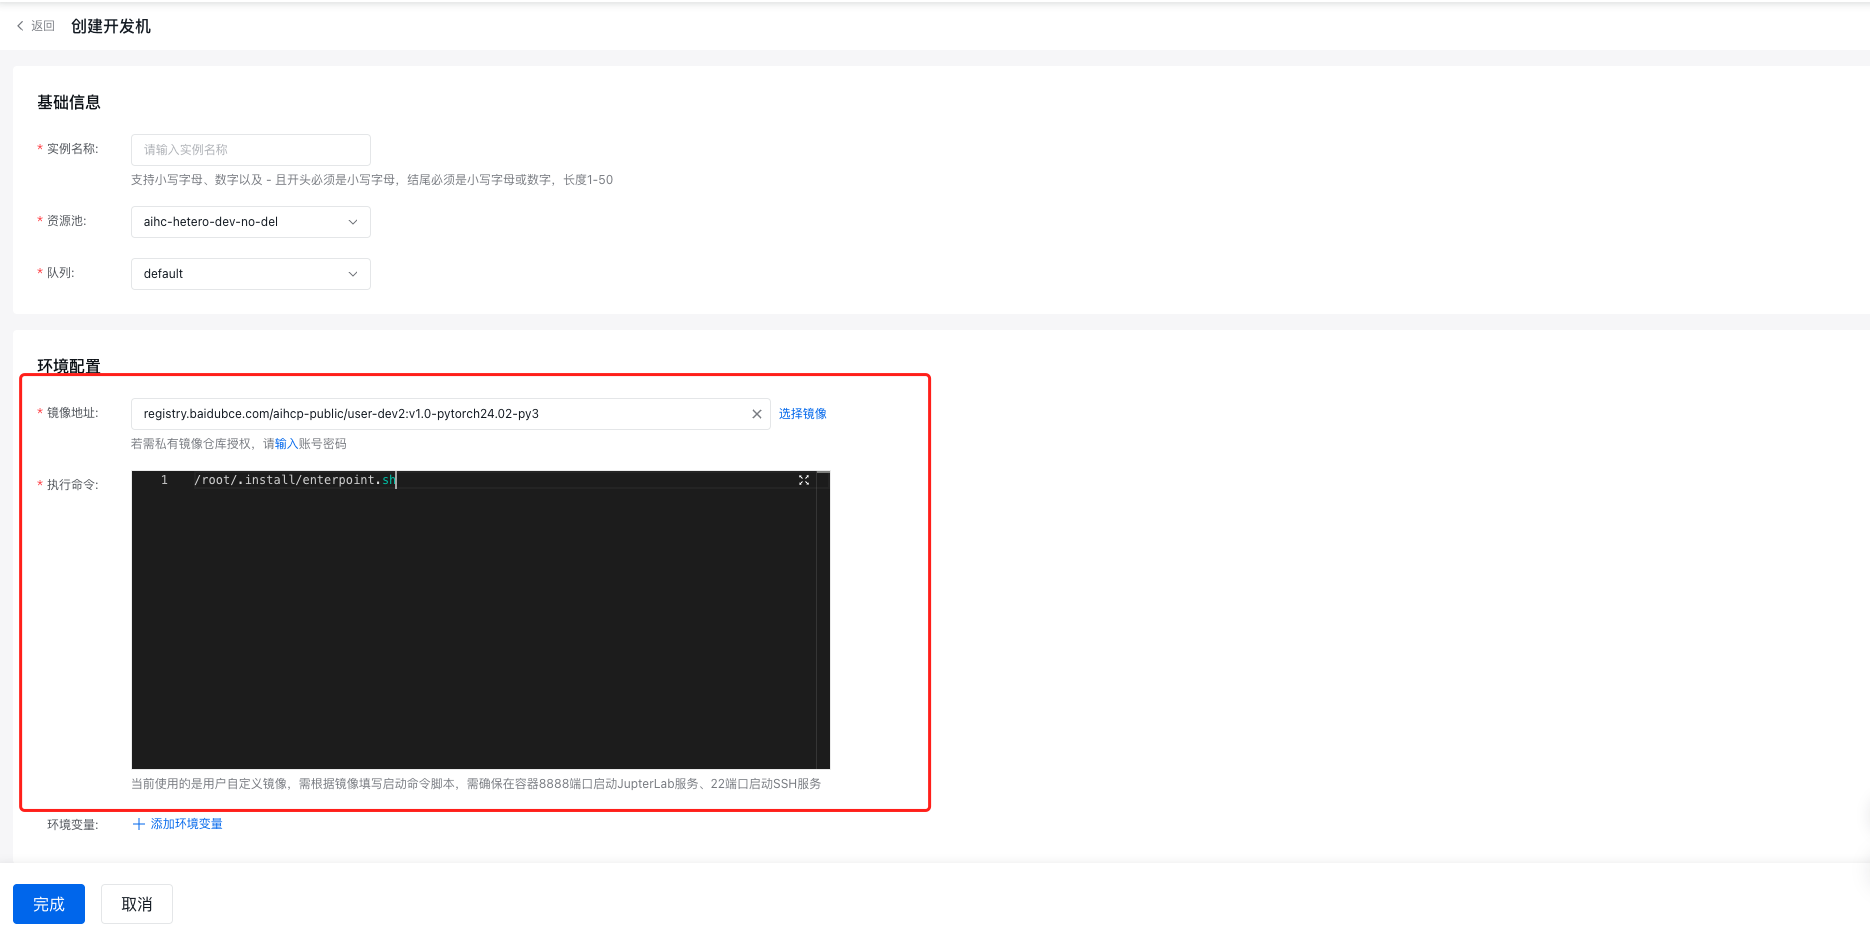
| 字段 | 说明 |
|---|---|
| 镜像地址 | 输入自定义镜像的拉取地址,建议将制作好的镜像上传到当前账号同区域下的企业版CCR实例中,通过【选择镜像】选择 |
| 执行命令 | 执行命令是创建开发机容器时的启动脚本,用户可根据自定义镜像设置编写自己的启动命令 |
使用上述示例打包的自定义镜像,使用/root/.install/enterpoint.sh,其含义是在容器启动时执行/root/.install/目录下的enterpoint.sh文件中的脚本内容
执行命令的设计使用详见下一章节
- 按创建开发机的一般流程设置其他参数,并提交创建。
如何设计执行命令
可以使用两种方式启动SSH服务和Jupyter服务(以下简称服务),用户可以根据使用习惯自行选择。
方式一:将镜像打包时将启动脚本保存为.sh文件
将镜像打包时将启动脚本保存为.sh文件,开发机启动时执行.sh脚本,示例镜像中采用的是此方法,,该方法需要在【执行命令】调用镜像中的.sh脚本
以示例镜像为例,启动命令:
Bash
1/root/.install/enterpoint.sh方式二:通过启动脚本在开发机中启动服务
此方法在【执行命令】中输入完整的启动命令,与方法一等效,以示例镜像为例,将enterpoint.sh中的内容直接输入到【执行命令】中即可
Bash
1#!/bin/bash# start sshdsudoservicessh restart
2#sudo service cron restart# jupyterlabJUPYTER_TOKEN=${JUPYTER_TOKEN:-$(pwgen -B -s 32 1)}exportJUPYTERLAB_BASE_URL=${JUPYTERLAB_BASE_URL:-"/jupyter"}exportJUPYTER_PORT=${JUPYTER_PORT:-8600}mkdir -p /root/.jupyter
3nohup jupyter-lab --NotebookApp.token="$JUPYTER_TOKEN"="$JUPYTER_TOKEN">/root/.jupyter/jupyter.log 2>&1&if[$? -ne 0];thenexit1fi# blockwhiletrue;dosleep60done
评价此篇文章