千帆+Langchain+VectorDB 建立简单的 RAG 示例
RAG 介绍
RAG是一种先进的自然语言处理方法,它结合了信息检索和文本生成技术,用于提高问答系统、聊天机器人等应用的性能。以下是RAG的详细工作流程:
RAG 的工作流程
RAG的工作流程
-
文档加载(Document Loading)
- 从各种来源加载大量文档数据。
- 这些文档将作为知识库,用于后续的信息检索。
-
文档分割(Document Splitting)
- 将加载的文档分割成更小的段落或部分。
- 这有助于提高检索的准确性和效率。
-
嵌入向量生成(Embedding Generation)
- 对每个文档或文档的部分生成嵌入向量。
- 这些嵌入向量捕捉文档的语义信息,方便后续的相似度比较。
-
写入向量数据库(Writing to Vector Database)
- 将生成的嵌入向量存储在一个向量数据库中。
- 数据库支持高效的相似度搜索操作。
-
查询生成(Query Generation)
- 用户提出一个问题或输入一个提示。
- RAG模型根据输入生成一个或多个相关的查询。
-
文档检索(Document Retrieval)
- 使用生成的查询在向量数据库中检索相关文档。
- 选择与查询最相关的文档作为信息源。
-
上下文融合(Context Integration)
- 将检索到的文档内容与原始问题或提示融合,构成扩展的上下文。
-
答案生成(Answer Generation)
- 基于融合后的上下文,RAG生成模型产生最终的回答或文本。
- 这一步骤旨在综合原始输入和检索到的信息。
准备环境
向量数据库环境
新用户可以创建免费版进行测试,免费版为单节点架构,地址:https://cloud.baidu.com/product/vdb.html
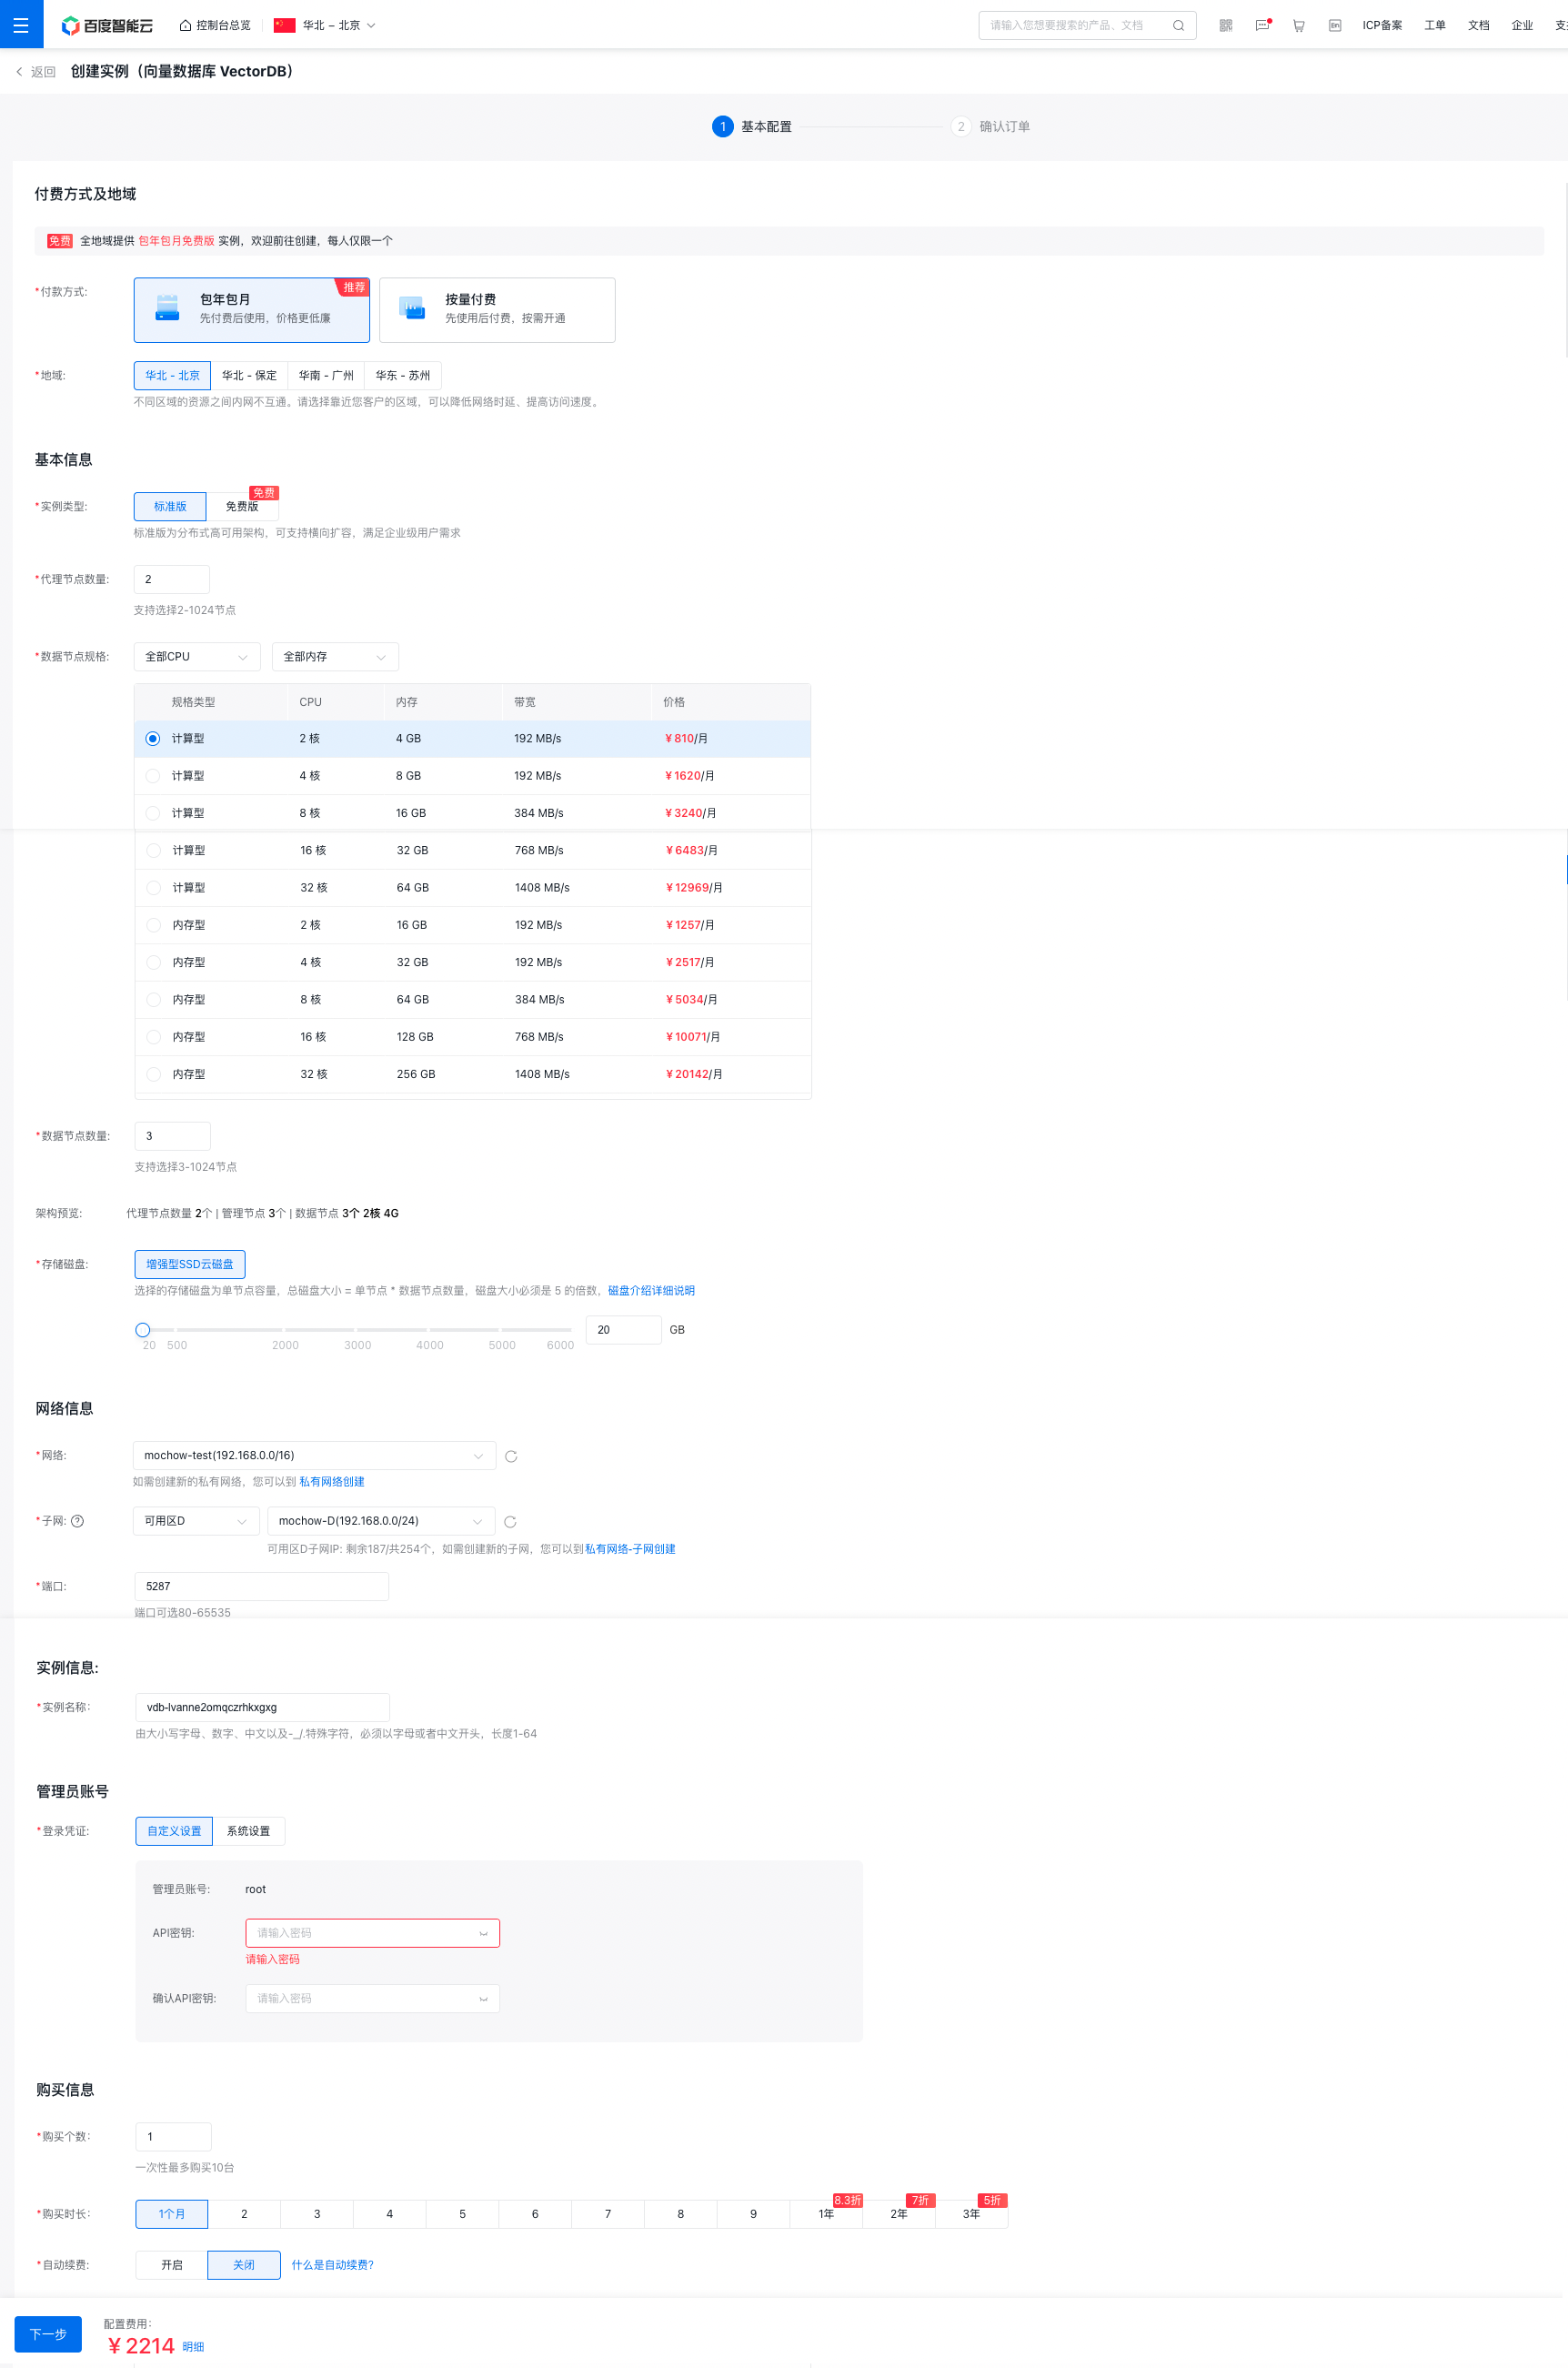
1、创建百度向量数据库实例,注意需要地域,可用区需要和 BCC 保持在同一个 VPC 内。 地址:https://console.bce.baidu.com/vdb/#/vdb/instance/create
2、创建成功后,通过实例详情页查看访问的地址信息和账号信息,用于访问操作向量数据库。如例子截图,访问信息如下:
1# 访问地址格式:http://${IP}:${PORT}
2访问地址:http://192.168.20.4:5287
3账号:root
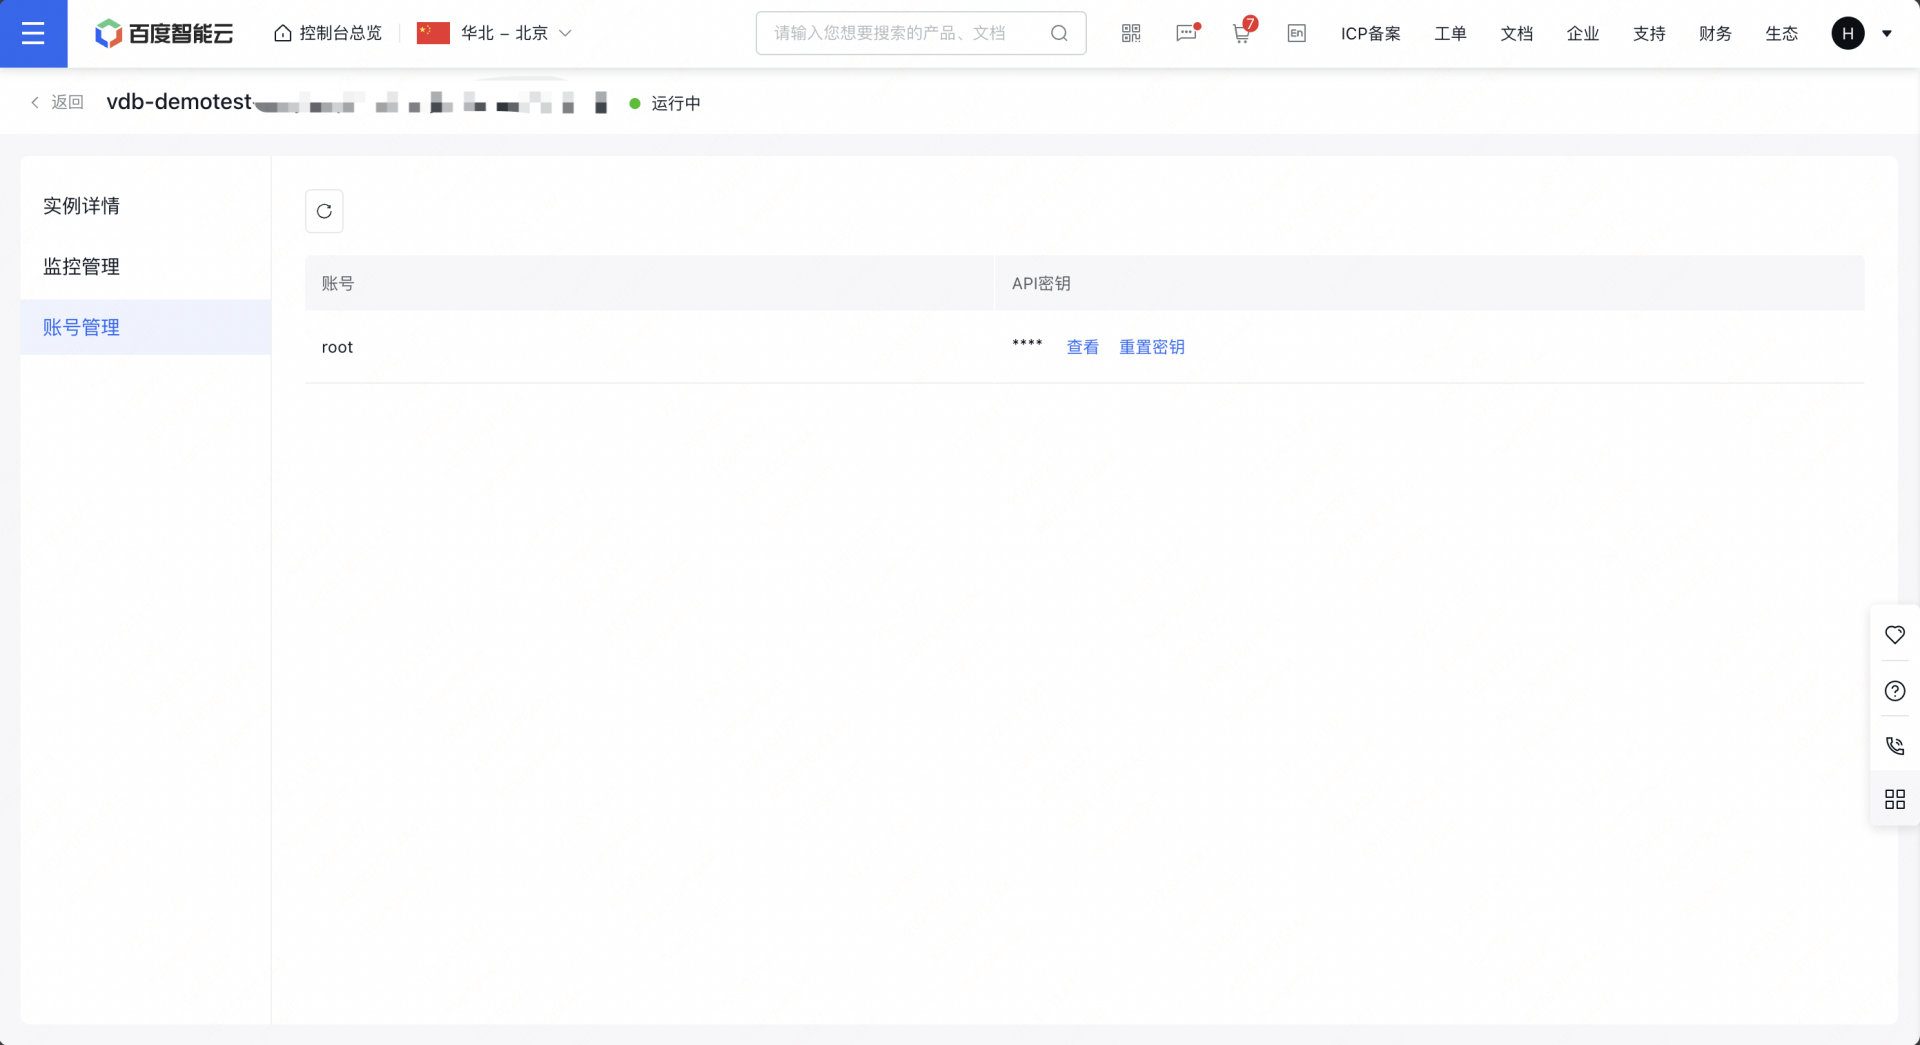
4密钥:xxxx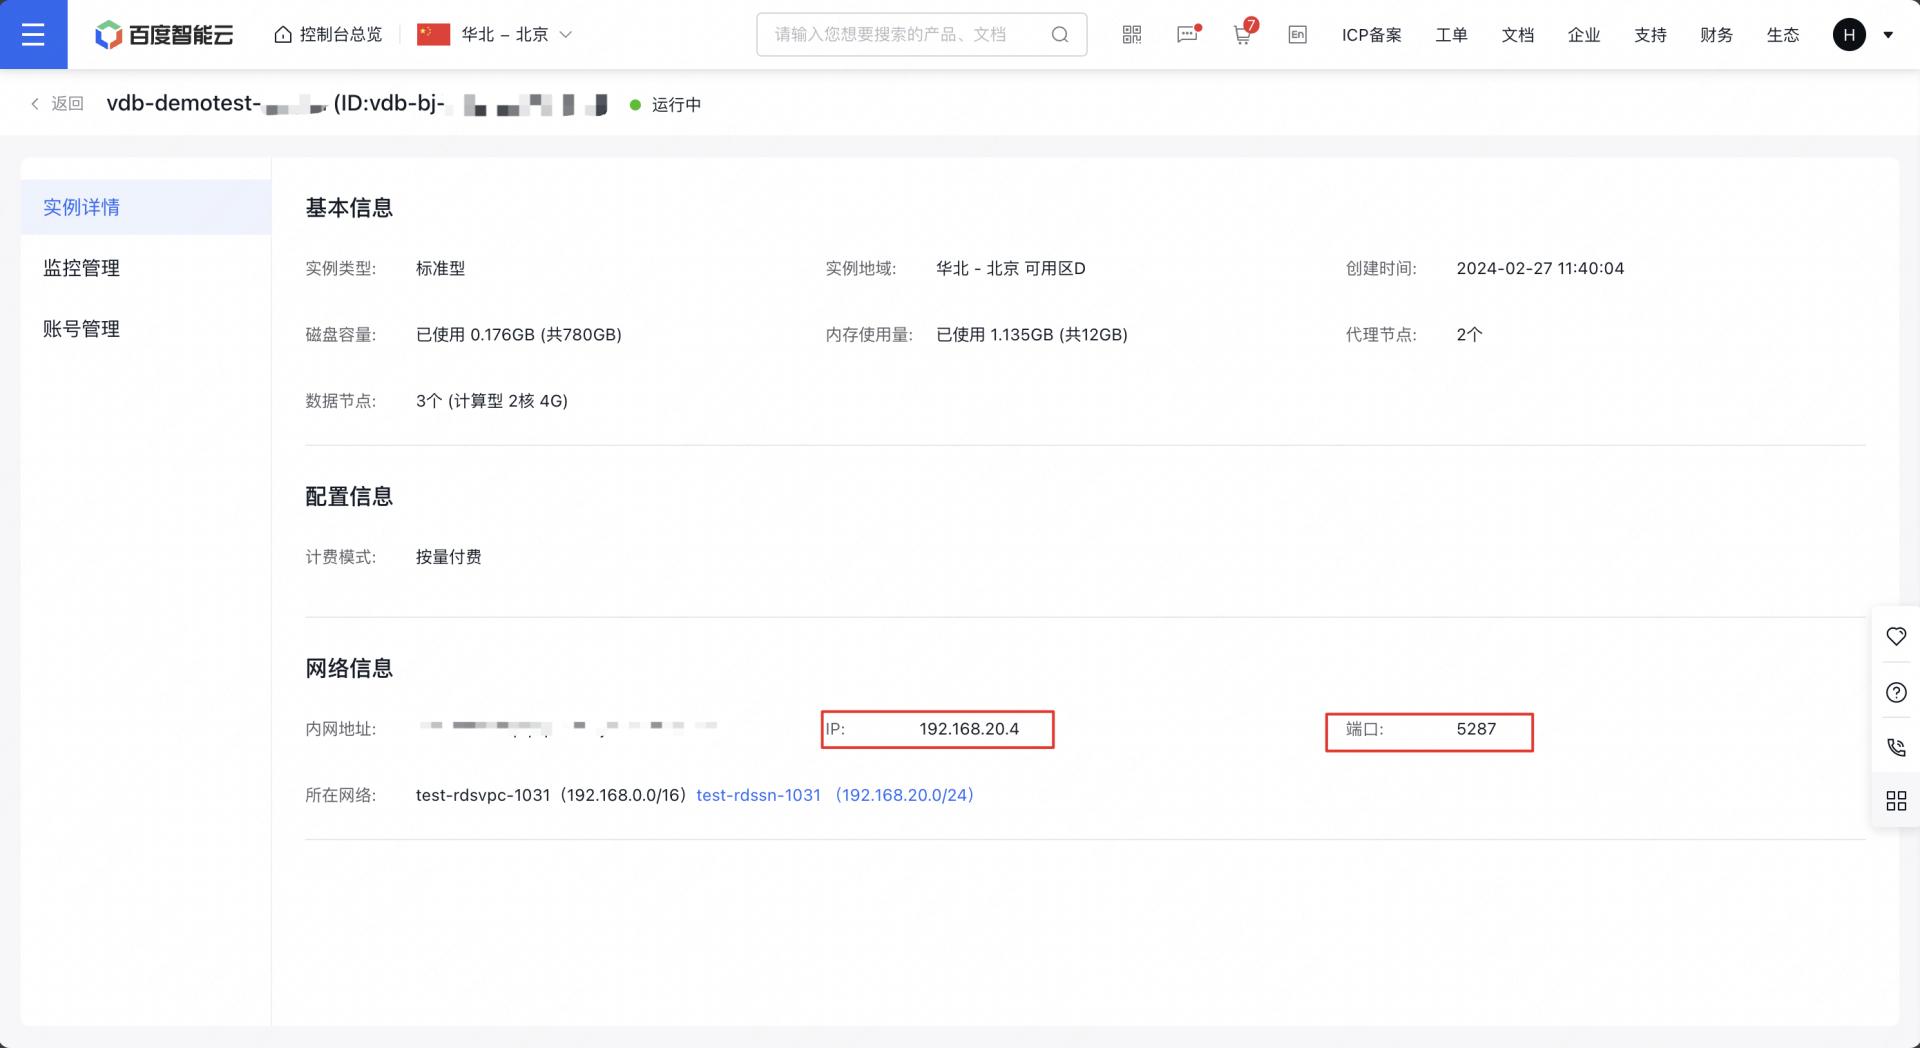
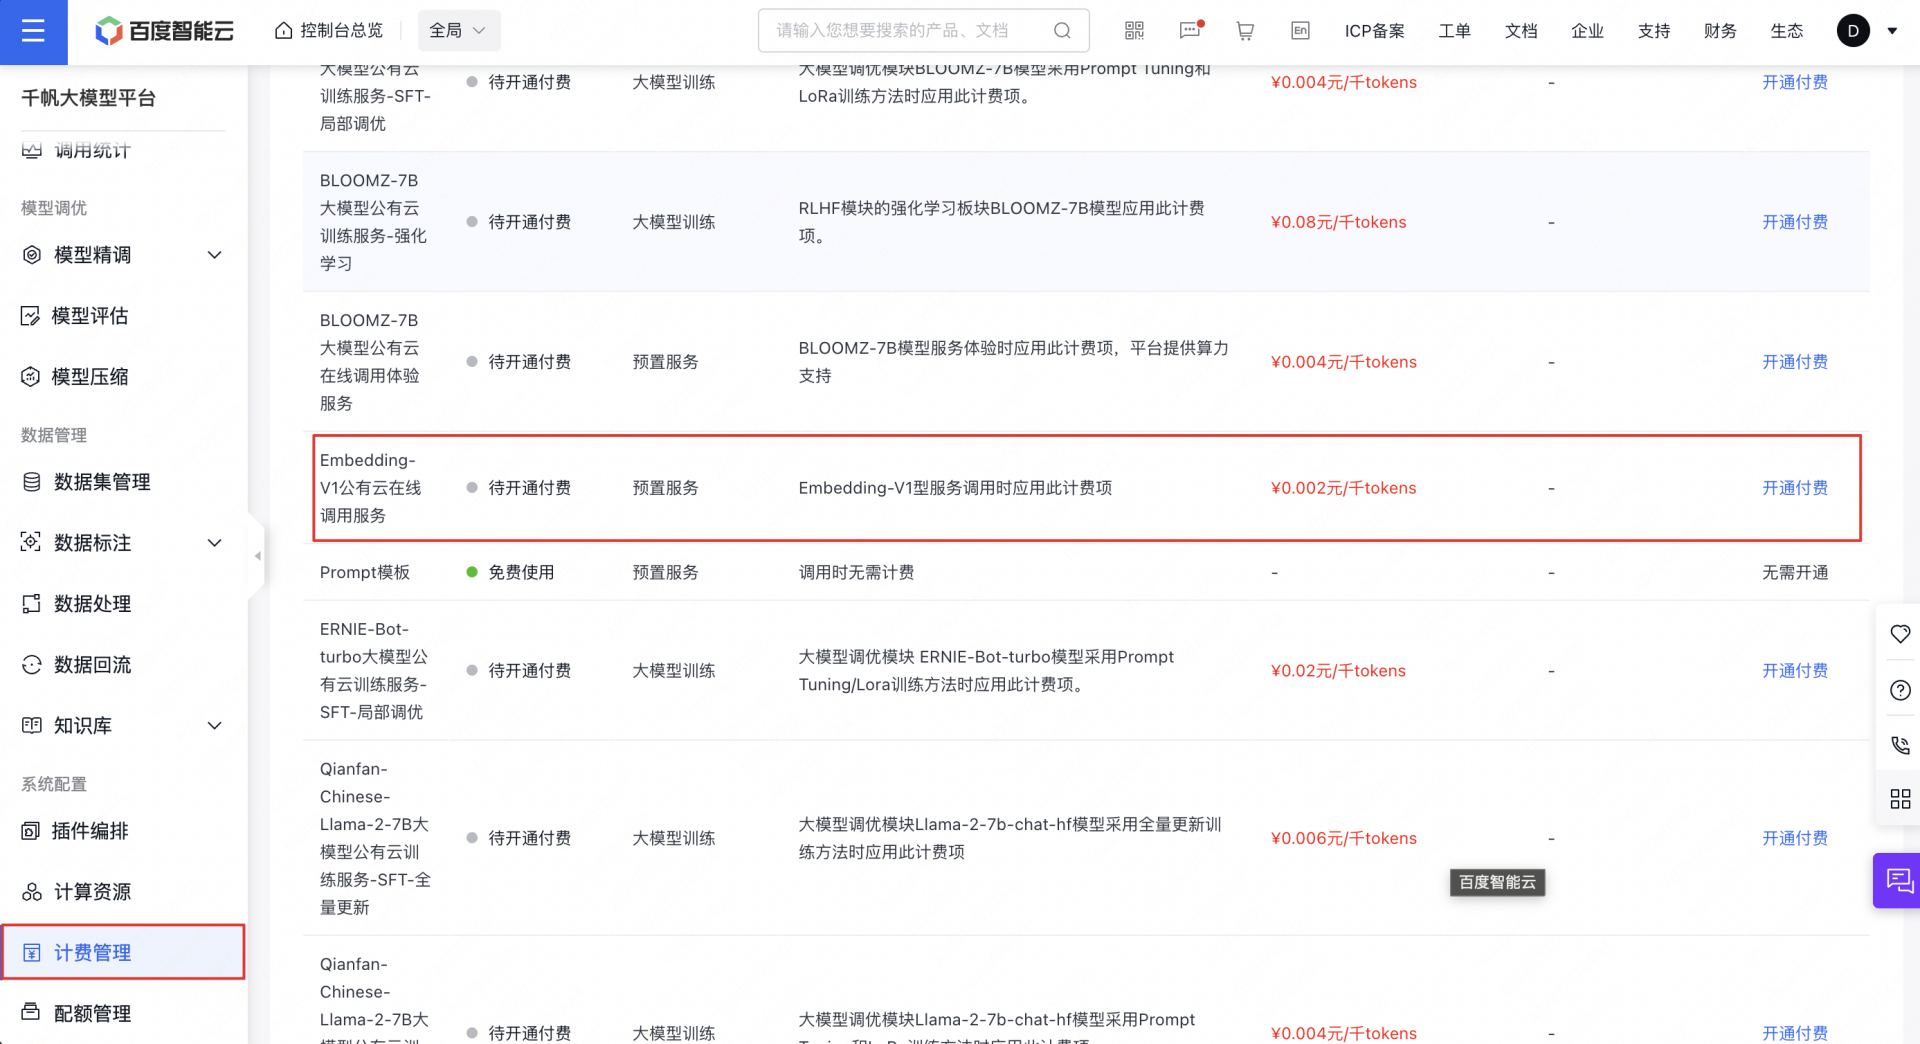
开通千帆 Embedding 模型
千帆模型开通付费之后才能使用,开通不会产生费用,且有代金券赠送
1、开通千帆 Embedding-V1 模型的收费,地址: https://console.bce.baidu.com/qianfan/chargemanage/list
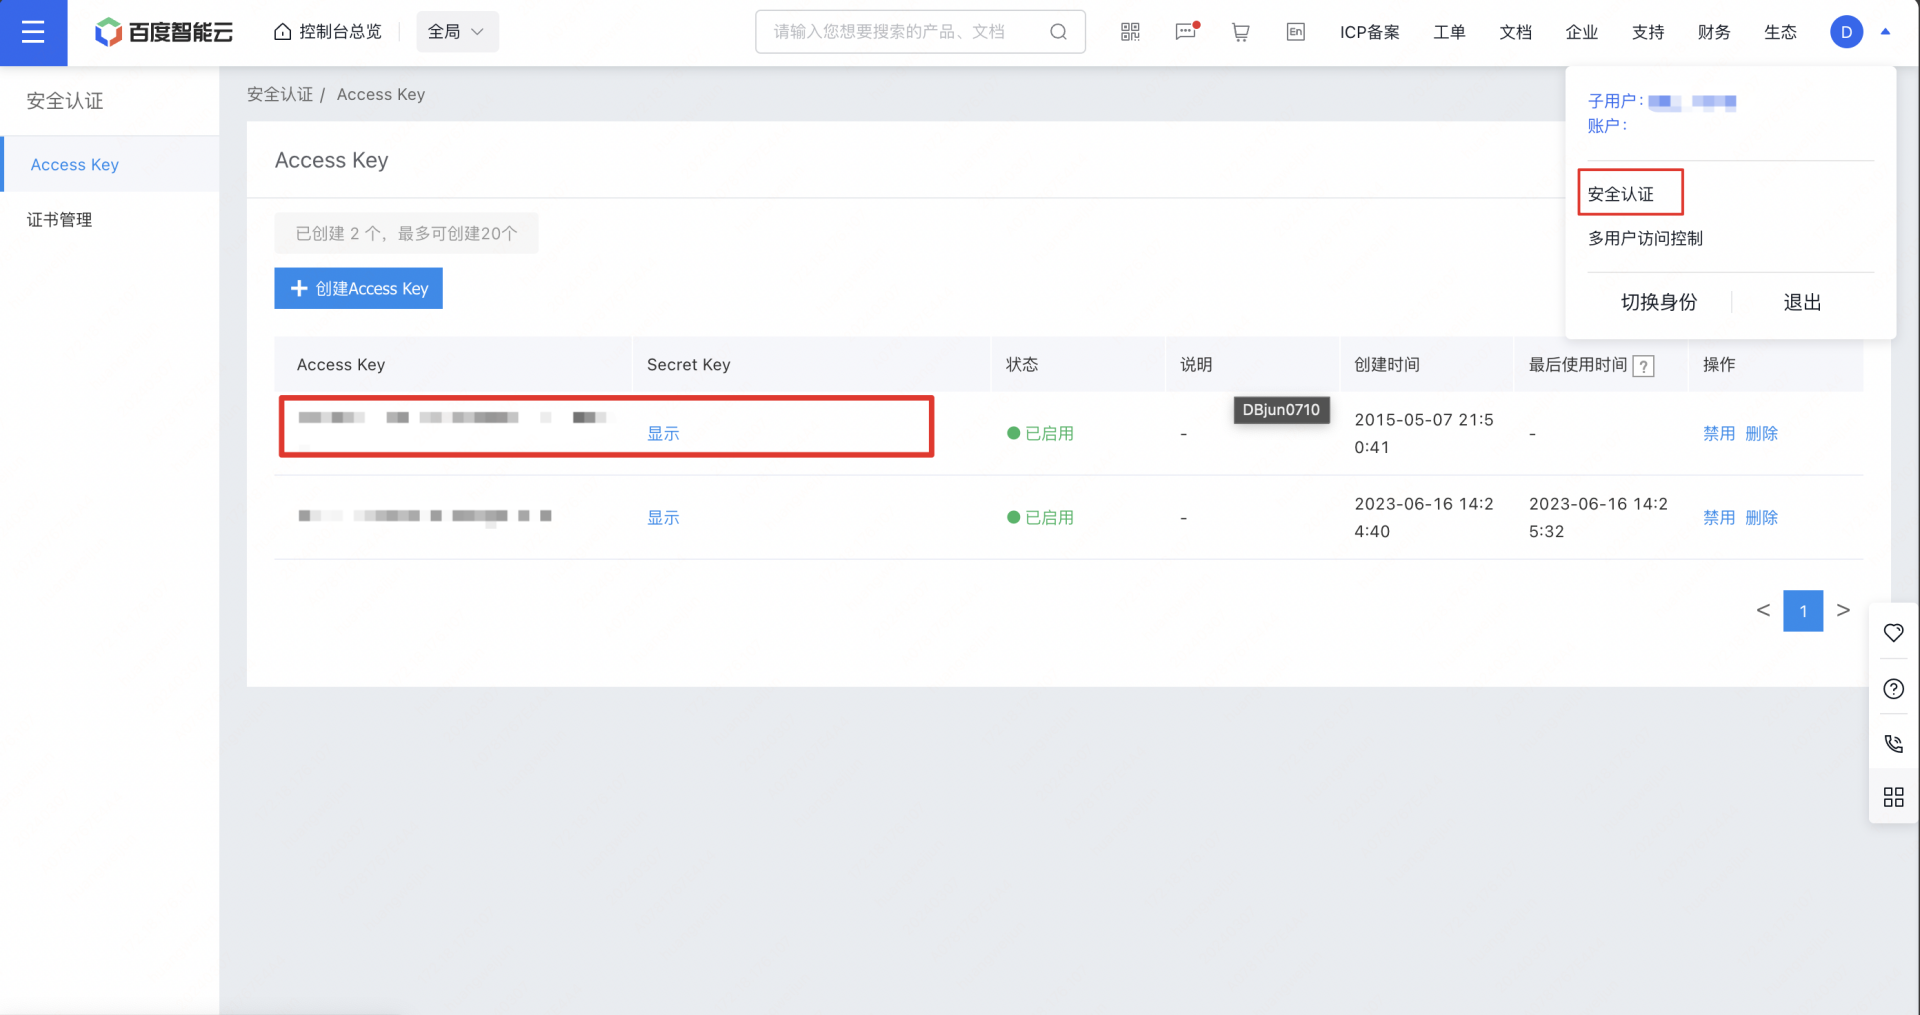
2、右上角个人中心的安全认证里面提取用于鉴权调用 Embedding 模型的 Access Key 和 Secret Key
客户端环境
数据准备和写入
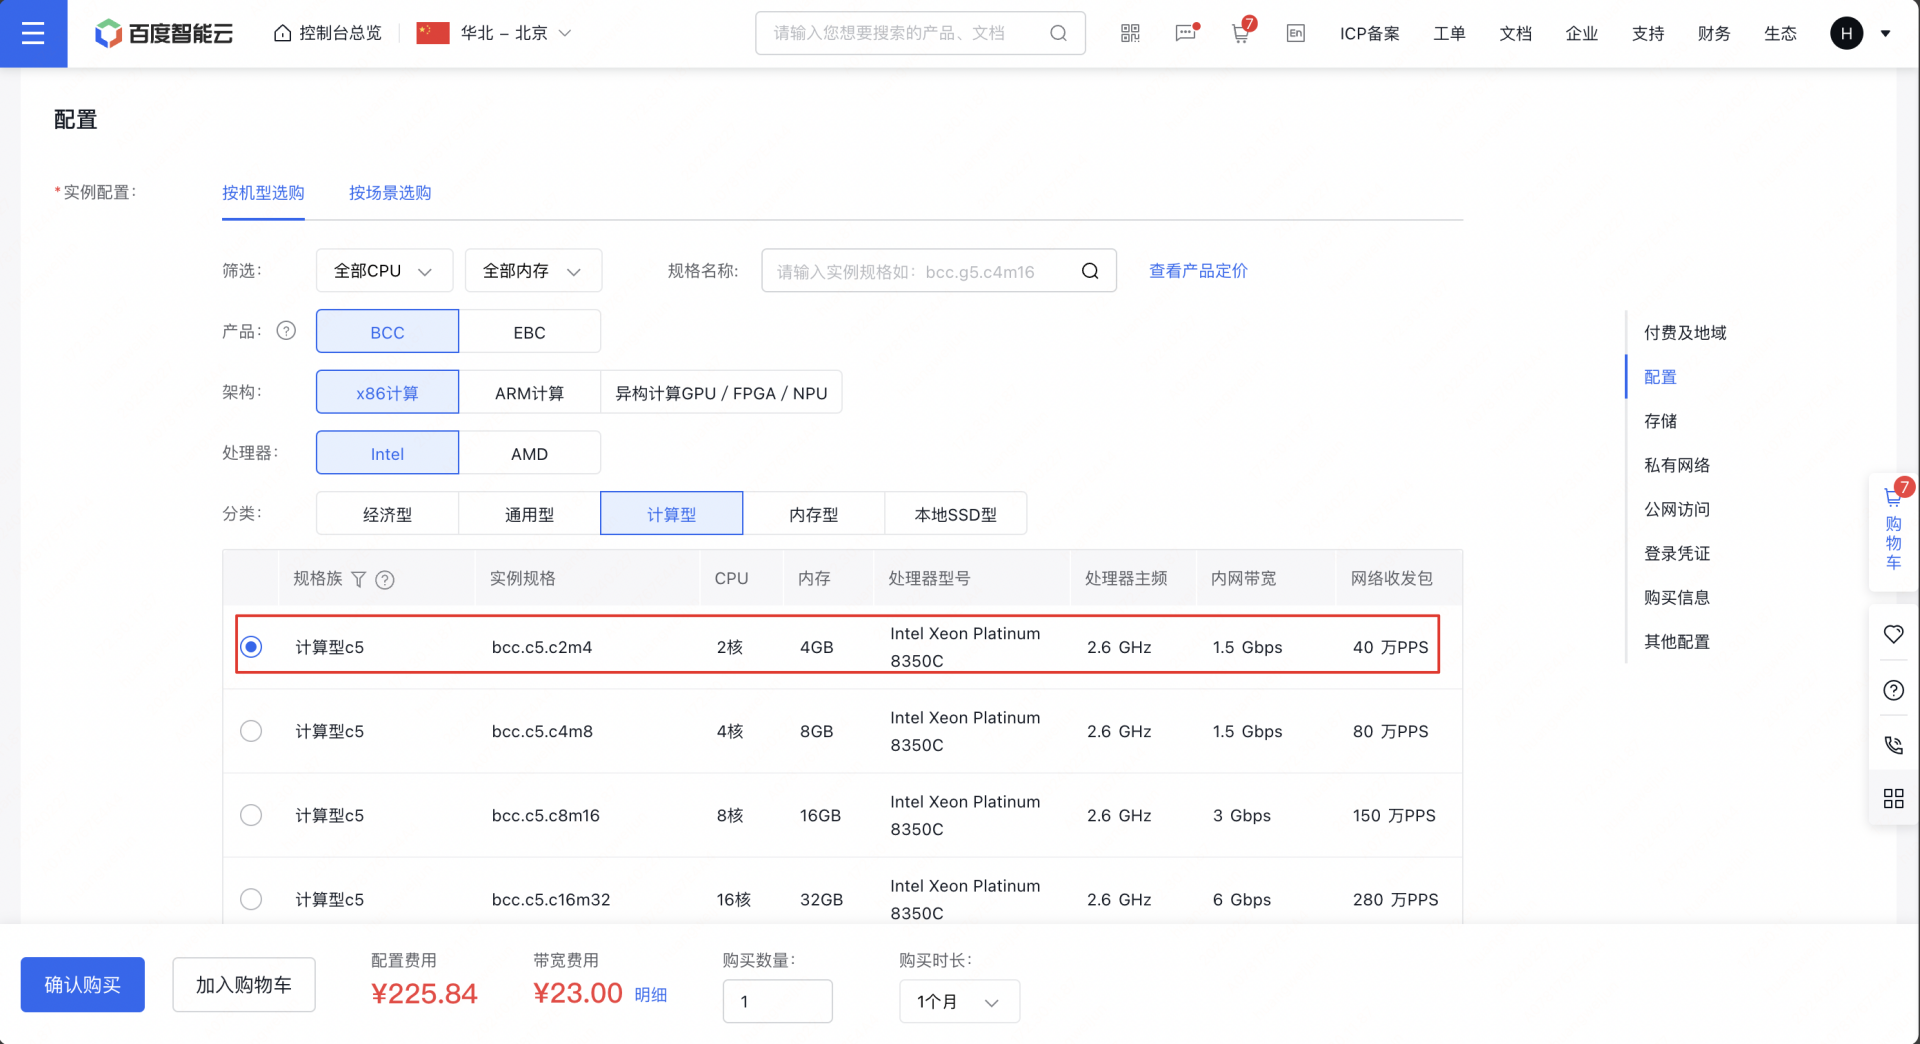
本例子使用的是 bcc 计算型 c5 2c4g 实例基于 Centos 系统作为例子,但不仅限于 bcc,只要是同 vpc 内的服务器产品都可以。已经有 BCC 客户端的用户忽略步骤 1。
1、创建 BCC 客户端。 地址:https://console.bce.baidu.com/bcc/#/bcc/instance/create
2、登录创建的实例进行环境准备,部署安装 python 环境和搭建知识库所必须的依赖包,
1# 安装 python 3.9
2yum install -y python39
3# langchain 依赖包,用于把文本数据转化为向量数据。
4# pymochow 依赖包,用于访问和操作百度向量数据库。
5# qianfan 依赖包,用于访问千帆大模型。
6# pdfplumber 依赖包,加载处理 pdf 文档。
7pip3.9 install "langchain>=0.1.13" pymochow qianfan pdfplumber
8# 创建项目目录
9mkdir -p knowledge/example_data && cd knowledge
3、上传一个 PDF 文件到 knowledge/example_data 目录下
4、创建访问的配置文件
1# config.py
2import os
3from pymochow.auth.bce_credentials import BceCredentials
4
5# 定义配置信息
6account = 'root'
7api_key = '修改为你的密钥'
8endpoint = '修改为之前记录的访问地址,如 http://192.168.20.4:5287'
9
10# 初始化BceCredentials对象
11credentials = BceCredentials(account, api_key)
12
13# 设置千帆AI平台的安全认证信息(AK/SK),通过环境变量
14# 注意替换以下参数为您的Access Key和Secret Key
15os.environ["QIANFAN_ACCESS_KEY"] = "your_iam_ak"
16os.environ["QIANFAN_SECRET_KEY"] = "your_iam_sk"
5、创建 document 数据库
1import pymochow
2from pymochow.configuration import Configuration
3import config  # 导入配置文件
4
5config_obj = Configuration(credentials=config.credentials, endpoint=config.endpoint)
6client = pymochow.MochowClient(config_obj)
7
8try:
9    db = client.create_database("document")
10except Exception as e:  # 捕获所有类型的异常
11    print(f"Error: {e}")  # 打印异常信息
12db_list = client.list_databases()
13for db_name in db_list:
14    print(db_name.database_name)
15client.close()
6、创建 chunks 数据表
1import time
2import pymochow  # 导入pymochow库,用于操作数据库
3from pymochow.configuration import Configuration  # 用于配置客户端
4import config  # 导入配置文件,包含身份验证和终端信息
5
6# 导入pymochow模型相关的类和枚举类型
7from pymochow.model.schema import Schema, Field, VectorIndex, SecondaryIndex, HNSWParams
8from pymochow.model.enum import FieldType, IndexType, MetricType, TableState
9from pymochow.model.table import Partition
10
11# 使用配置文件中的信息初始化客户端
12config_obj = Configuration(credentials=config.credentials, endpoint=config.endpoint)
13client = pymochow.MochowClient(config_obj)
14
15# 选择或创建数据库
16db = client.database("document")
17
18# 定义数据表的字段
19fields = [
20    Field("id", FieldType.UINT64, primary_key=True, partition_key=True, auto_increment=False, not_null=True),
21    Field("text", FieldType.STRING),
22    Field("metadata", FieldType.STRING),
23    Field("source", FieldType.STRING),
24    Field("author", FieldType.STRING, not_null=True),
25    Field("vector", FieldType.FLOAT_VECTOR, not_null=True, dimension=384)
26]
27
28# 定义数据表的索引
29indexes = [
30    VectorIndex(index_name="vector_idx", field="vector", index_type=IndexType.HNSW, metric_type=MetricType.L2, params=HNSWParams(m=32, efconstruction=200)),
31    SecondaryIndex(index_name="author_idx", field="author")
32]
33
34# 尝试创建数据表,捕获并打印可能出现的异常
35try:
36    # replication 数量不超过实例数据节点的数量
37    # 免费版参考值 replication=1
38    # 标准版参考值 replication=3
39    table = db.create_table(table_name="chunks", replication=1, partition=Partition(partition_num=1), schema=Schema(fields=fields, indexes=indexes))
40except Exception as e:  # 捕获所有类型的异常
41    print(f"Error: {e}")  # 打印异常信息
42
43# 轮询数据表状态,直到表状态为NORMAL,表示表已准备好
44while True:
45    time.sleep(2)  # 每次检查前暂停2秒,减少对服务器的压力
46    table = db.describe_table("chunks")
47    if table.state == TableState.NORMAL:  # 表状态为NORMAL,跳出循环
48        break
49
50# 打印数据表的详细信息
51print("table: {}".format(table.to_dict()))
52
53client.close()  # 关闭客户端连接
7、从PDF文档中加载数据、将文档内容分割为更小的文本块以及利用千帆AI平台的接口来对文本进行向量化表示,并且写到 chunks 表,本例子会用小的文档作为例子,用户可以根据实际情况加载。
1# 导入必要的库
2from langchain_community.document_loaders import PDFPlumberLoader  # 用于加载PDF文档
3from langchain.text_splitter import RecursiveCharacterTextSplitter  # 用于文本分割
4from langchain_community.embeddings import QianfanEmbeddingsEndpoint # langchian千帆embedding
5import os  # 用于操作系统功能,如设置环境变量
6import time  # 用于暂停执行,避免请求频率过高
7import json
8import pymochow
9import config  # 导入配置文件
10from pymochow.model.table import Row # 用于写入向量数据
11from pymochow.configuration import Configuration
12
13
14# 加载PDF文档
15loader = PDFPlumberLoader("./example_data/ai-paper.pdf")  # 指定PDF文件路径
16documents = loader.load()  # 加载文档
17print(documents[0])  # 打印加载的第一个文档内容
18
19# 设置文本分割器,指定分割的参数
20# chunk_size定义了每个分割块的字符数,chunk_overlap定义了块之间的重叠字符数
21# separators列表定义了用于分割的分隔符
22text_splitter = RecursiveCharacterTextSplitter(
23    chunk_size=384,
24    chunk_overlap=0,
25    separators=["\n\n", "\n", " ", "", "。", ","]
26)
27all_splits = text_splitter.split_documents(documents)  # 对文档进行分割
28print(all_splits[0])  # 打印分割后的第一个块内容
29
30emb = QianfanEmbeddingsEndpoint()  # 初始化嵌入模型对象
31
32embeddings = []  # 用于存储每个文本块的嵌入向量
33for chunk in all_splits:  # 遍历所有分割的文本块
34    # 获取文本块的嵌入向量,使用默认模型Embedding-V1
35    resp = emb.embed_query(chunk.page_content)
36    embeddings.append(resp)  # 将嵌入向量添加到列表中
37    time.sleep(1)  # 暂停1秒,避免请求过于频繁
38print(embeddings[0])  # 打印第一个文本块的嵌入向量
39
40# 逐行写入向量化数据
41rows = []
42for index, chunk in enumerate(all_splits):
43    metadata = "{}"
44    if chunk.metadata is not None:
45        metadata = json.dumps(chunk.metadata)
46    row = Row(
47        id=index,
48        text=chunk.page_content,
49        metadata=metadata,
50        source=chunk.metadata["source"],
51        author=chunk.metadata["Creator"],
52        vector=embeddings[index]
53    )
54    rows.append(row)
55# 打印第一个Row对象转换成的字典格式,以验证数据结构
56print(rows[0].to_dict())
57
58# 读取数据库配置文件,并且初始化连接
59config_obj = Configuration(credentials=config.credentials, endpoint=config.endpoint)
60client = pymochow.MochowClient(config_obj)
61
62# 选择或创建数据库
63db = client.database("document")
64
65try:
66    table = db.describe_table("chunks")
67    table.upsert(rows=rows) # 批量写入向量数据,一次最多支持写入1000条
68    table.rebuild_index("vector_idx") # 创建向量索引,必要步骤
69except Exception as e:  # 捕获所有类型的异常
70    print(f"Error: {e}")  # 打印异常信息
71client.close()
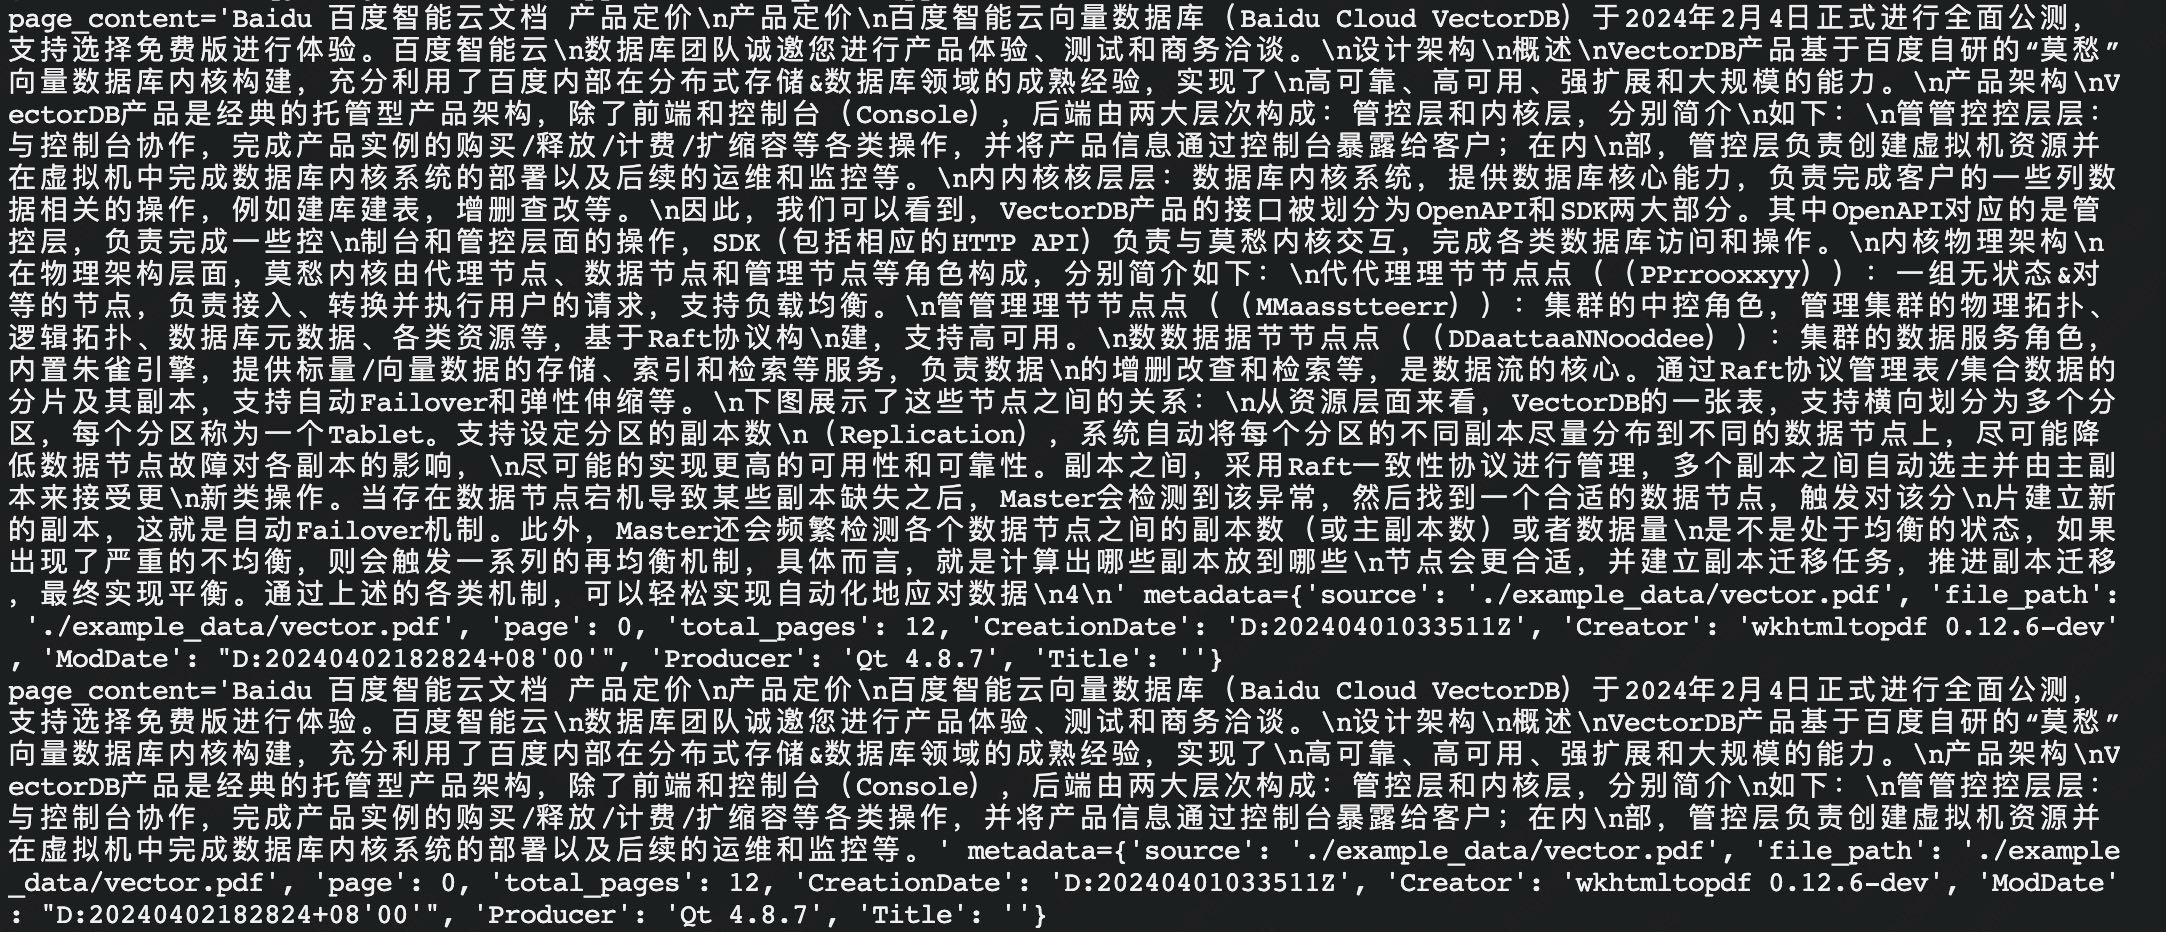
当打印到如下的数据证明你写入成功了。
RAG 问答示例
结合百度向量数据库、Langchain、千帆实现一个简单的RAG功能。
1import os
2import config
3from langchain_community.vectorstores import BaiduVectorDB
4from langchain_community.vectorstores.baiduvectordb import ConnectionParams, TableParams
5from langchain_community.embeddings import QianfanEmbeddingsEndpoint
6from langchain_openai import ChatOpenAI
7from langchain.chains import RetrievalQA
8
9# 初始化向量嵌入和连接参数
10embeddings = QianfanEmbeddingsEndpoint()
11conn_params = ConnectionParams(
12    endpoint=config.endpoint,
13    account=config.account,
14    api_key=config.api_key
15)
16
17# 初始化百度云向量数据库
18vector_db = BaiduVectorDB(
19    embedding=embeddings,
20    connection_params=conn_params,
21    table_params=TableParams(384),
22    database_name="document",
23    table_name="chunks",
24    drop_old=False,
25)
26
27# 初始化检索器和对话模型
28retriever = vector_db.as_retriever(search_type="similarity")
29qianfan_chat_model = ChatOpenAI(
30        api_key="bce-v3/ALTAK-***",  # 千帆平台的api key
31        base_url="https://qianfan.baidubce.com/v2/",
32        model="ernie-speed-128k"
33)
34
35# 初始化问答模块
36qa = RetrievalQA.from_chain_type(llm=qianfan_chat_model, chain_type="refine", retriever=retriever, return_source_documents=True)
37
38# 接收用户输入的问题
39query = input("\nYour question: ")
40
41# 处理用户问题并获取答案和相关文档
42res = qa(query)
43answer, docs = res['result'], res['source_documents']
44
45# 打印用户提出的问题和系统给出的回答
46print("\n\n> Question:")
47print(query)
48print("\n> Answer:")
49print(answer)
运行之后我们就可以基于文档提问,如提问"VectorDB 的数据引擎叫什么,用中文回答",Demo 会把相关的文档内容提炼答复,如下图所示

标量和向量检索示例
1、基于标量的检索
1import pymochow
2from pymochow.configuration import Configuration
3import config  # 导入配置文件
4
5config_obj = Configuration(credentials=config.credentials, endpoint=config.endpoint)
6client = pymochow.MochowClient(config_obj)
7
8# 选择或创建数据库
9db = client.database("document")
10
11try:
12    table = db.describe_table("chunks")
13    primary_key = {'id': 0}
14    projections = ["id", "text", "source", "author"]
15    res = table.query(
16        primary_key=primary_key,
17        projections=projections,
18        retrieve_vector=True
19    )
20except Exception as e:  # 捕获所有类型的异常
21    print(f"Error: {e}")  # 打印异常信息
22
23print(res)
24client.close()
2、基于向量的检索
1import os
2import config
3import pymochow
4import qianfan
5from pymochow.configuration import Configuration
6from pymochow.model.table import AnnSearch, HNSWSearchParams
7
8# 初始化千帆AI平台的嵌入模型对象
9emb = qianfan.Embedding()
10
11# 定义待查询的问题文本
12question = "讲解下大模型的发展趋势"
13
14# 获取问题文本的嵌入向量
15resp = emb.do(texts=[question])
16question_embedding = resp['data'][0]['embedding']
17
18# 使用配置信息初始化向量数据库客户端
19config_obj = Configuration(credentials=config.credentials, endpoint=config.endpoint)
20client = pymochow.MochowClient(config_obj)
21
22# 选择数据库
23db = client.database("document")
24
25try:
26    # 获取指定表的描述信息
27    table = db.describe_table("chunks")
28    # 构建近似最近邻搜索对象
29    anns = AnnSearch(
30        vector_field="vector",  # 指定用于搜索的向量字段名
31        vector_floats=question_embedding,  # 提供查询向量
32        params=HNSWSearchParams(ef=200, limit=1)  # 设置HNSW算法参数和返回结果的限制数量
33    )
34    # 执行搜索操作
35    res = table.search(anns=anns)
36    # 打印搜索结果
37    print(res)
38except Exception as e:  # 捕获并打印所有异常信息
39    print(f"Error: {e}")
40
41# 关闭客户端连接
42client.close()
3、基于标量和向量的混合检索
1import os
2import config
3import pymochow
4import qianfan
5from pymochow.configuration import Configuration
6from pymochow.model.table import AnnSearch, HNSWSearchParams
7
8# 初始化千帆AI平台的嵌入模型对象
9emb = qianfan.Embedding()
10
11# 定义待查询的问题文本
12question = "讲解下大模型的发展趋势"
13
14# 获取问题文本的嵌入向量
15resp = emb.do(texts=[question])
16question_embedding = resp['data'][0]['embedding']
17
18# 使用配置信息初始化向量数据库客户端
19config_obj = Configuration(credentials=config.credentials, endpoint=config.endpoint)
20client = pymochow.MochowClient(config_obj)
21
22# 选择数据库
23db = client.database("document")
24
25try:
26    # 获取指定表的描述信息
27    table = db.describe_table("chunks")
28    # 构建近似最近邻搜索对象
29    anns = AnnSearch(
30        vector_field="vector",  # 指定用于搜索的向量字段名
31        vector_floats=question_embedding,  # 提供查询向量
32        params=HNSWSearchParams(ef=200, limit=1),  # 设置HNSW算法参数和返回结果的限制数量
33        filter="author='CNKI'" # 提供标量的过滤条件
34    )
35    # 执行搜索操作
36    res = table.search(anns=anns)
37    # 打印搜索结果
38    print(res)
39except Exception as e:  # 捕获并打印所有异常信息
40    print(f"Error: {e}")
41
42# 关闭客户端连接
43client.close()