
创建异构机密计算实例
产品介绍
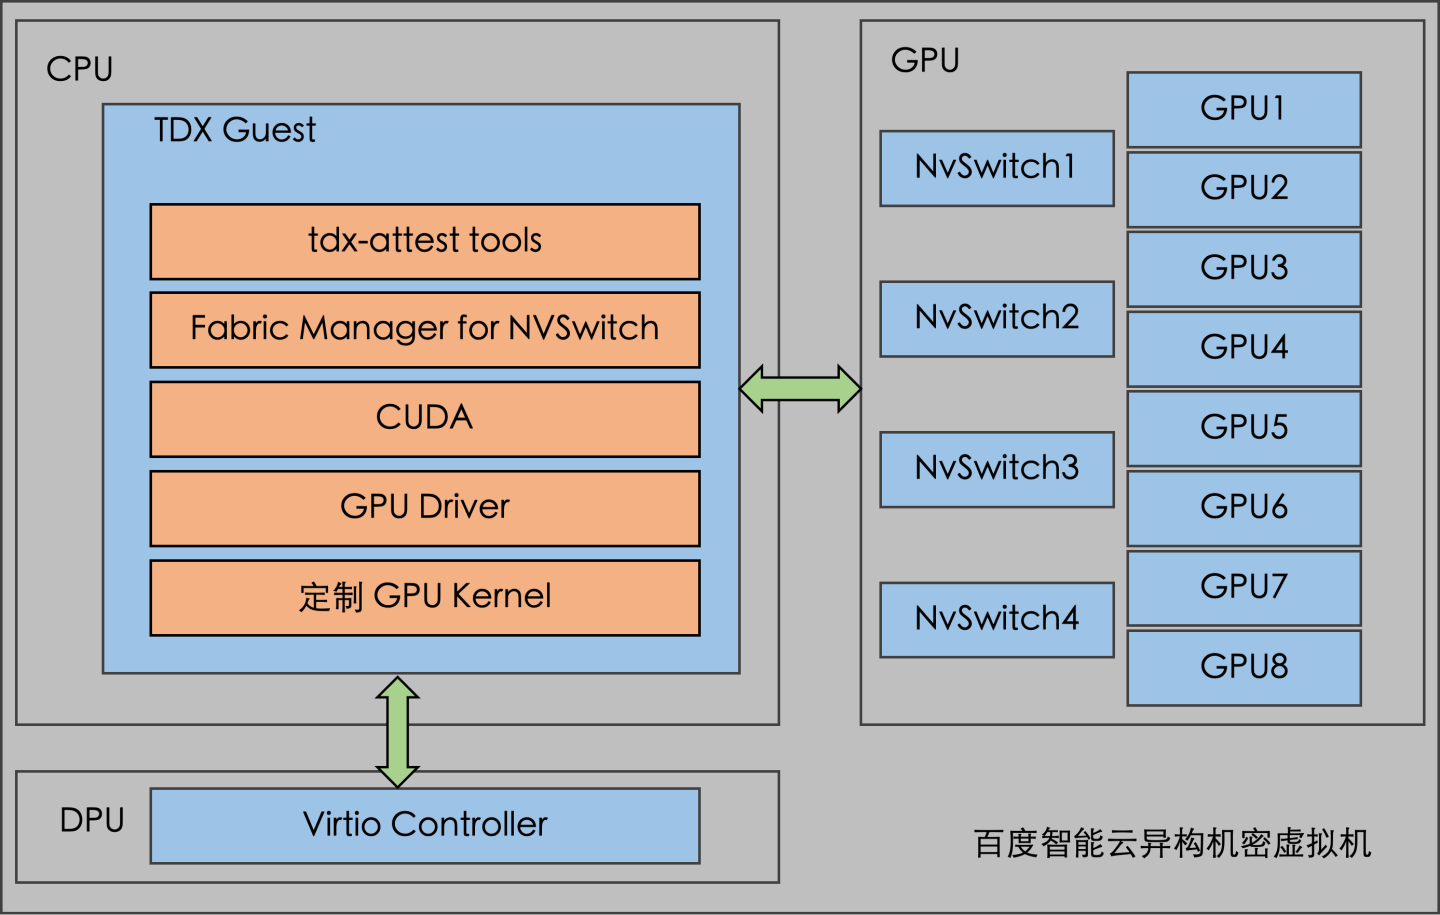
百度智能云第七代异构机密虚拟机,引入了 NVIDIA 提出的 Protect PCIe 加密模式。该模式支持将多块 GPU 直通到同一虚拟机,并能通过 NVLink 或 NVSwitch 构建高速互连集群,显著拓展了机密计算在更大规模、更高性能场景下的应用边界。
与此同时,为进一步提升能力,我们在多卡机密虚拟机的基础上,引入了智能网卡,实现了可全资源售卖的异构机密虚拟机。而在搭载新款英特尔® 至强® 处理器及 BF3 智能网卡的第七代虚拟机上,通过将网络和存储 I/O 全面卸载至智能网卡,实现了计算与内存资源的完整售卖,为客户提供了更优的资源利用与性能体验。
适用范围
异构机密计算仅支持Ubuntu22.04 镜像。若使用基于Ubuntu22.04 构建的自定义镜像创建实例,请确保其内核版本不低于6.6.0。
创建异构机密计算实例
https://cloud.baidu.com/doc/BCC/s/8kbbkwg4p
构建异构机密计算环境
步骤一:安装GPU 驱动
异构机密机型的对应的镜像已经提供稳定验证过的 GPU 驱动和服务组件:
1- GPU 驱动:
2http://mirrors.baidubce.com/nvidia-binary-driver/driver/x86_64/NVIDIA-Linux-x86_64-570.195.03.run
3- fabric-manager
4http://mirrors.baidubce.com/nvidia-binary-driver/fabricmanager/x86_64/ubuntu/nvidia-fabricmanager-570_570.195.03-1_amd64.deb
5- libnvidia-nscq
6https://developer.download.nvidia.cn/compute/cuda/repos/ubuntu2204/x86_64/libnvidia-nscq-570_570.195.03-1_amd64.deb
步骤二:检查TDX 状态
-
检查 TDX 的状态,通过 lscpu 查询 tdx_guest feature 是否开启:
Plain Text1lscpu | grep -i tdx_guest - 下图所示表示 TDX 已被正确启用。

- 确认操作系统内核已经加载支持了 Intel TDX 的模块,并且成功创建了设备节点。
ls /dev/tdx_guest
-
TDX 开启后,可以看到 OS 中检测到 TDX,且使用了 TDX aware idle routine 和 Memory Encryption Features:
Plain Text1dmesg | grep -i tdx
步骤三:进行TDX 的远程认证
-
下载以下三个Guest依赖的软件包
类型 依赖的软件包 下载地址 md5sum 软件源 sgx_debian_local_repo.tgz https://download.01.org/intel-sgx/sgx-dcap/1.21/linux/distro/ubuntu22.04-server/sgx_debian_local_repo.tgz 71169068a5f0f99d203ad9f3d7976a9f TDX SDK sgx_linux_x64_sdk_2.24.100.3.bin https://download.01.org/intel-sgx/sgx-dcap/1.21/linux/distro/ubuntu22.04-server/sgx_linux_x64_sdk_2.24.100.3.bin bc8c3453b44c6c6ce0c9fa1804cd2565 认证工具 DCAP_1.21.tar.gz https://github.com/intel/confidential-computing.tee.dcap/archive/refs/tags/DCAP_1.21.tar.gz c4f2bd528e153f651adc9564a5b200b5 Plain Text1# 1) download apt repo ,tdx sdk and SGX attest tool src code 2mkdir /tmp/tdx-attest/ && cd /tmp/tdx-attest/ 3wget https://download.01.org/intel-sgx/sgx-dcap/1.21/linux/distro/ubuntu22.04-server/sgx_debian_local_repo.tgz 4wget https://download.01.org/intel-sgx/sgx-dcap/1.21/linux/distro/ubuntu22.04-server/sgx_linux_x64_sdk_2.24.100.3.bin 5wget https://github.com/intel/confidential-computing.tee.dcap/archive/refs/tags/DCAP_1.21.tar.gz -
配置tdx本地软件源,apt安装tdx软件源软件包和编译工具
Plain Text1# 2) create tdx apt local repo if needed 2if [ ! -d "/srv/sgx_debian_local_repo/pool/" ];then 3 tar zxvf sgx_debian_local_repo.tgz 4 mkdir -p /srv 5 mv sgx_debian_local_repo /srv 6cat <<EOF >> /etc/apt/sources.list.d/sgx_debian_local_repo.list 7deb [trusted=yes arch=amd64] file:/srv/sgx_debian_local_repo jammy main 8EOF 9 apt update 10 fi 11 12apt install -y dkms 13apt install -y libtdx-attest libtdx-attest-dev 14apt install -y libsgx-dcap-quote-verify 15apt install -y libsgx-dcap-quote-verify-dev 16apt install -y libsgx-ae-qve 17apt install -y --no-install-recommends libsgx-enclave-common-dev libsgx-dcap-default-qpl libsgx-dcap-default-qpl-dev sgx-ra-service libsgx-urts -
编译“quote生成工具”
Plain Text1cd /opt/intel/tdx-quote-generation-sample/ 2make -
安装tdx sdk
Plain Text1if [ ! -d "/opt/intel/sgxsdk/" ];then 2 cd /tmp/tdx-attest/ 3 chmod +x sgx_linux_x64_sdk_2.24.100.3.bin 4 echo -e "no\n /opt/intel/\n" |./sgx_linux_x64_sdk_2.24.100.3.bin 5 source /opt/intel/sgxsdk/environment 6fi -
解压“quote验证工具”源码并编译
Plain Text1tar zxvf DCAP_1.21.tar.gz 2cd confidential-computing.tee.dcap-DCAP_1.21 3cd SampleCode/QuoteVerificationSample/ 4make clean 5make DEBUG=1`` -
更新配置文件的pccs_url地址
Plain Text1sed -i -r 's|(\"pccs_url\": \"https://)[^/]+|\"pccs_url\": \"https://pccs.baidubce.com:8081|g' /etc/sgx_default_qcnl.conf 2sed -i 's/,\"use_secure_cert\": false/,\"use_secure_cert\": true/g' /etc/sgx_default_qcnl.conf -
运行“quote生成工具”生成quote,运行“quote验证工具”验证quote;
Plain Text1# # generate quote,returning "Successfully get the TD Quote" means success 2/opt/intel/tdx-quote-generation-sample/test_tdx_attest 3# Verify this quote, returning sentences below means success 4# [APP] Info: App: tee verify quote successfully returned. 5# [APP] Info: App: Verification completed successfully. 6./confidential-computing.tee.dcap-DCAP_1.21/SampleCode/QuoteVerificationSample/app -quote ./quote.dat- test_tdx_attest 返回 "Successfully get the TD Quote" 表示成功获取quote
-
QuoteVerificationSample/app 返回 如下语句表示验证quote成功;
- [APP] Info: App: tee verify quote successfully returned.
步骤四:进行GPU 的远程认证
-
使用 PPCIE Verifier Tool 远程认证:
Plain Text1git clone --branch 2025.7.17.001 --depth 1 https://github.com/NVIDIA/nvtrust.git 2cd guest_tools/ppcie-verifier/install 3source ppcie-installer.sh 4# 使用REMOTE模式认证 5python3 -m ppcie.verifier.verification --gpu-attestation-mode=REMOTE --switch-attestation-mode=REMOTE -
认证结果:
Plain Text1root@localhost:~# python3 -m ppcie.verifier.verification --gpu-attestation-mode=REMOTE --switch-attestation-mode=REMOTE 2************************************************** 3* PPCIE: Starting PPCIE Verification Tool * 4************************************************** 5************************************************** 6* PPCIE: Number of GPUs are: 8 * 7************************************************** 8************************************************** 9* PPCIE: Number of NVSwitches are: 4 * 10************************************************** 11Nonce generated: 336dc288b84a9ae4e662d49e3c9a93eef1c1ee07c48438345be4922142617ce8 12Number of GPUs available : 8 13Fetching GPU 0 information from GPU driver. 14Fetching GPU 1 information from GPU driver. 15Fetching GPU 2 information from GPU driver. 16Fetching GPU 3 information from GPU driver. 17Fetching GPU 4 information from GPU driver. 18Fetching GPU 5 information from GPU driver. 19Fetching GPU 6 information from GPU driver. 20Fetching GPU 7 information from GPU driver. 21All GPU Evidences fetched successfully 22************************************************** 23* PPCIE: Attesting the GPUs * 24************************************************** 25**** Attestation Successful **** 26************************************************** 27* PPCIE: GPU Attestation result: True * 28************************************************** 29************************************************** 30* PPCIE: GPU Attestation Completed * 31************************************************** 32Nonce generated: 7f819b02fa597f2aed1d374cfbbbc7ba30e926d8456ef3d927801ec5285276e5 33Getting evidence details for SWX-ECF27482-21CD-0760-CC25-8601BA6D0384 34Getting evidence details for SWX-486104D3-6B2E-C8C7-9C45-1F11BF66E4ED 35Getting evidence details for SWX-0338600B-35AC-6013-6F70-14645C210F9A 36Getting evidence details for SWX-29F38DD9-7F07-FD6D-01A1-962008099559 37All nvSwitch Evidences fetched successfully 38************************************************** 39* PPCIE: Attesting the switches * 40************************************************** 41**** Attestation Successful **** 42************************************************** 43* PPCIE: Switch attestation result is True * 44************************************************** 45************************************************** 46* PPCIE: Switch Attestation Completed * 47************************************************** 48************************************************** 49* PPCIE: GPU state is READY * 50************************************************** 51+--------------------+---------+ 52| STAGE | STATUS | 53+--------------------+---------+ 54| GPU Pre-checks | SUCCESS | 55| Switch Pre-checks | SUCCESS | 56| GPU Attestation | SUCCESS | 57| Switch Attestation | SUCCESS | 58| Topology checks | SUCCESS | 59+--------------------+---------+ 60************************************************** 61* PPCIE: End of PPCIE Verification Tool * 62**************************************************
使用限制
- 性能损耗:开启GPU机密计算特性后,CPU与GPU之间的数据传输需要加解密,因此GPU相关的性能相较异构非机密计算实例存在一定损失。
- 重启限制:开启了TDX特性的实例不支持内部重启(即在操作系统内部不支持执行reboot命令)。
- 远程访问:实例暂不支持VNC登录实例。
-
镜像限制:
- 仅支持UEFI镜像,机密计算套餐仅支持机密计算的自定义镜像,不能和普通BCC的自定义镜像互相通用。
- 异构机密计算实例暂不支持Windows镜像。
- 不支持过旧的内核版本,内核版本需要大于等于 6.6.0。
- 暂不支持挂载弹性RDMA网卡等。大规格插入多张ERI弹性网卡可能会导致实例崩溃,如遇此情况,请在控制台将对应实例关机并且卸载对应弹性网卡以从启动失败中恢复。
- 可用内存差异:开启了TDX特性的实例内部将使用特定的非加密内存(SWIOTLB)用于外设通信,该内存区域的大小默认情况下为1 GiB。
-
IO性能瓶颈:若您的实例负载涉及大量的IO通信,则可能因SWIOTLB不足导致性能下降。若确认该问题存在,可以尝试调大SWIOTLB大小以改善实例的性能,具体操作如下:
- 将SWIOTLB的大小修改为 4GiB,打开 /etc/default/grub,修改 GRUB_CMDLINE_LINUX_DEFAULT 行中的 swiotlb 参数,如:
Plain Text1``` 2GRUB_CMDLINE_LINUX_DEFAULT="console=tty1 console=ttyS0 console=hvc0 swiotlb=2097152 iommu=pt noccfilter ioremap_force_shared authorize_allow_devs=ALL:ALL" 3```修改参数后,执行 update-grub 命令,刷新 grub.cfg 文件。重新虚拟机后,新的 swiotlb 参数生效。(说明:SWIOTLB参数取值的计算方法为:目标大小(以MiB为单位)* 512)
注意事项
- 单GPU卡实例使用CUDA 12.4,NVIDIA的cuBLAS库存在已知问题,运行CUDA任务或大语言模型任务的时候可能会出错,需要安装特定版本的cuBLAS。
-
GPU开启机密计算特性后,初始化比较慢(特别是8 GPU卡机密实例,在5分钟左右),Guest OS启动后,请务必确认nvidia-persistenced服务已经启动完成(active (running) 表示服务运行中),再执行nvidia-smi或者其他命令使用GPU。检查nvidia-persistenced服务状态的命令为:
Plain Text1systemctl status nvidia-persistenced -
任何会使用GPU的自启动服务(包含bcm-agent, has-agent),都需要在nvidia-persistenced.service之后启动,根据需要配置nvidia-persistenced.service的依赖关系,
/usr/lib/systemd/system/nvidia-persistenced.service设置示例如下: `[Unit] Description=NVIDIA Persistence Daemon After=syslog.targetPlain Text1[Service] 2Type=forking 3PIDFile=/var/run/nvidia-persistenced/nvidia-persistenced.pid 4Restart=always 5ExecStart=/usr/bin/nvidia-persistenced --verbose 6ExecStopPost=/bin/rm -rf /var/run/nvidia-persistenced/* 7TimeoutSec=600 8 9[Install] 10WantedBy=multi-user.target 11Before=nvidia-fabricmanager.service 12```使用系统提供的镜像时,系统中已经提供 bcm-agent、has-agent、nvidia-persistenced等服务的依赖关系支持。
评价此篇文章