Dapp应用层开发
Dapp应用层要做什么
Dapp应用层最主要的是实现用户侧的交互逻辑,包括web页面和页面事件响应。同时不同的操作会带来不同的事件,我们还需要针对页面事件去调用后端链码方法,存入便签、更新便签、读取便签等。
由于是基于React框架做的实现,我们首先要准备一套Dapp应用层的开发环境。
Dapp应用层开发环境准备
- 首先需要安装nodejs环境,本文采用的是v10.16.0版本,npm版本为v6.9.0。我们可以使用nvm安装,也可以通过系统自带的包管理安装。具体的下载安装方法这里不再赘述,可参考官方文档:Node.js下载安装指导
- 准备好nodejs和npm环境后,我们可以一键创建一个React项目。根据不同的环境,我们有两种命令。
1$ npx create-react-app notewall-dapp
2or
3$ create-react-app notewall-dapp- 执行完之后,我们可以进入notewall-dapp目录,目录里是一个标准的未装任何依赖的项目目录。
- 试着启动一下
1$ npm startnpm会启动这个react项目,并且将http server监听在本地3000端口。浏览器访问http://localhost:3000可以查看结果。
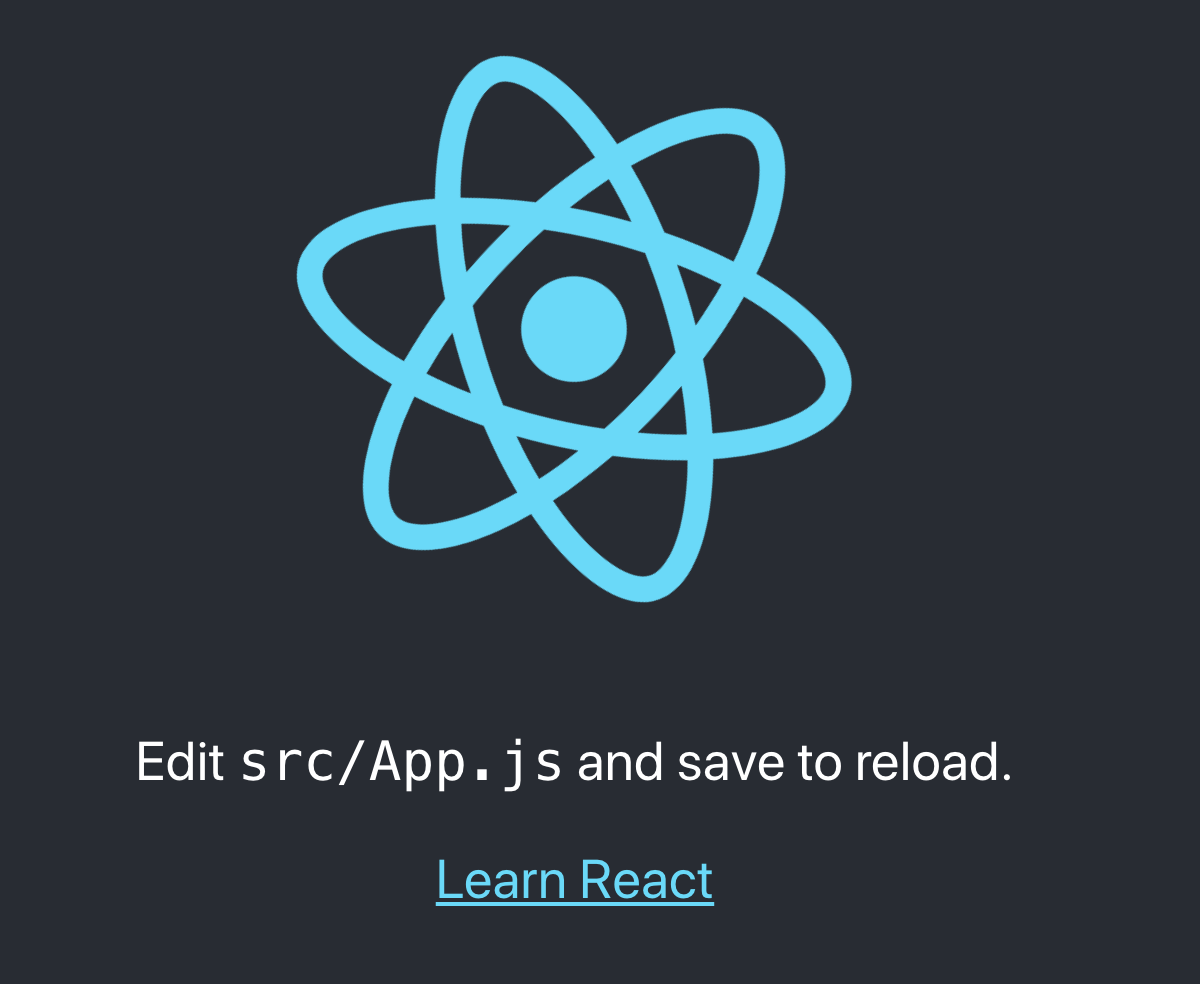
如果我们看到了如下页面显示,则代表项目环境初始化完成,我们可以开始编写应用代码了。
Dapp应用层开发
如上所述,Dapp应用层主要分为两大部分,一个是页面展示与交互逻辑,另一个是与链码的交互。页面展示与交互逻辑由前端和后端部分完成,与链码的交互由后端部分完成。与以太坊不需要后端服务器不同,Fabric与链码交互时,需要msp、证书等信息,需要由后端保存,所以Fabric Dapp多了后端服务器的实现。
我们可以规划项目目录,新建两个子目录分别为client和server。server中主要实现与合约的交互逻辑,client目录中主要实现用于前端展示的组件,为了保持实现语言上的一致性,前后端统一用nodejs实现。
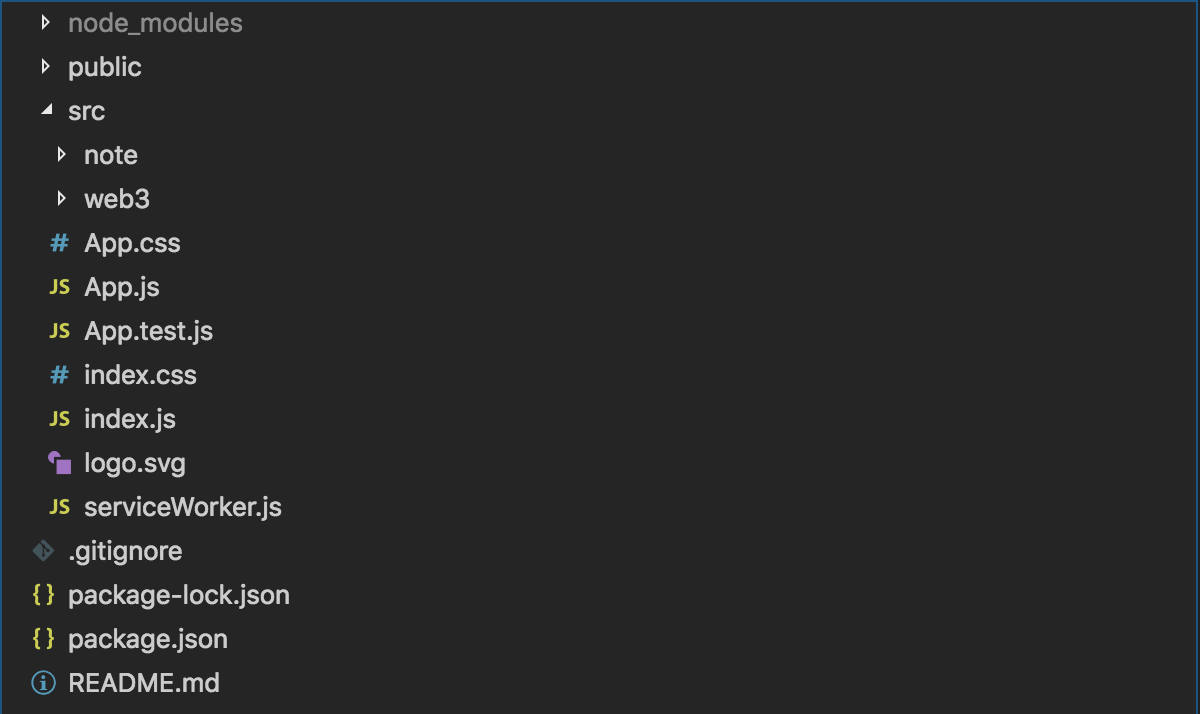
合约交互
由于前端页面展示风格千变万化,我们可以先从后端逻辑实现起来。与链码的交互,我们使用Fabric官方提供的Node SDK。 结合最初的用例分析,我们需要在三个事件中与链码进行交互。
- 当用户打开应用时,需要展示所有的便签
- 当用户新增便签点击上链后,需要将便签内容保存。相对于我们已经实现的链码是InsertNote操作。
- 当用户更新便签点击上链后,需要将便签内容的更新保存下来。在合约中是UpdateNote操作。
准备网络配置
为了实现在外网环境下与Dapp的交互我们在超级链BaaS平台中创建联盟链类型的fabric网络,在网络详情页面可以看到网络的详细配置,在页面右上角可以下载生成的网络证书文件。

fabric网络信息如下:
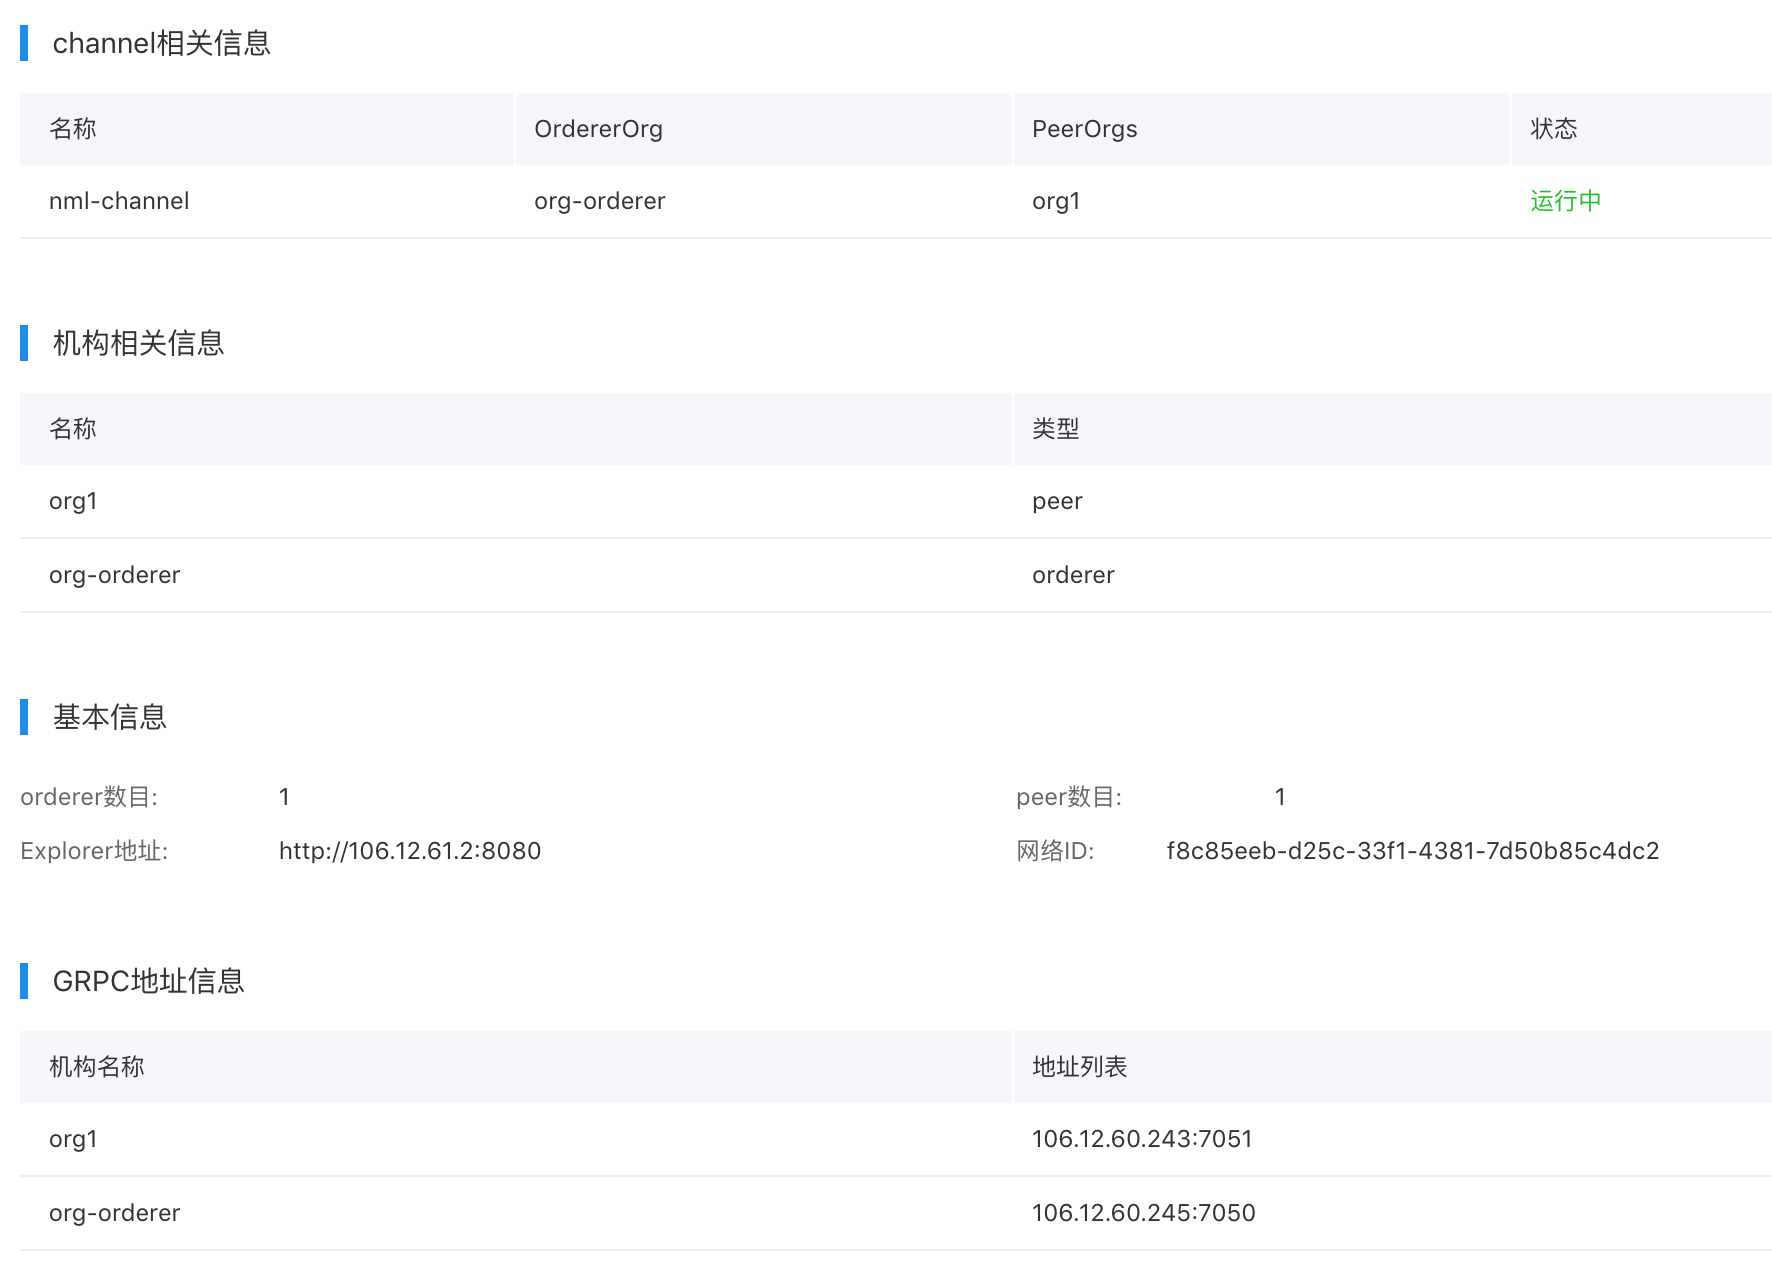
因为生成Fabric Client需要根据网络信息进行配置,需要提前准备好并使服务启动时能够读取。我们在项目中创建artifacts目录用于存放这些信息,Client配置中主要是网络信息及证书。目录如下:
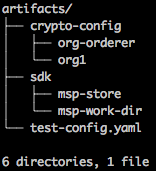
网络配置test_config.yaml详细内容如下:
1name: "config"
2
3version: 1.0.0
4
5client:
6  organization: org1
7  logging:
8    level: debug
9  credentialStore:
10    path: artifacts/sdk/msp-store
11    cryptoStore:
12      path: artifacts/sdk/msp-work-dir
13  BCCSP:
14    security:
15     enabled: true
16     default:
17      provider: "SW"
18     hashAlgorithm: "SHA2"
19     softVerify: true
20     level: 256
21  tlsCerts:
22    systemCertPool: false
23    client:
24      keyfile:
25      certfile:
26
27organizations:
28  org-orderer:
29    mspid: org-ordererMSP
30    certificateAuthorities:
31      - ca.org-orderer
32    adminPrivateKey:
33      path: artifacts/crypto-config/org-orderer/users/Admin@org-orderer/msp/keystore/0210362ecc00e5511bd924799dccadc3b015d804c0f0a7633041dfb2471ecc0e_sk
34    signedCert:
35      path: artifacts/crypto-config/org-orderer/users/Admin@org-orderer/msp/admincerts/Admin@org-orderer-cert.pem
36    peers:
37
38
39  org1:
40    mspid: org1MSP
41    certificateAuthorities:
42      - ca.org1
43    adminPrivateKey:
44      path: artifacts/crypto-config/org1/users/Admin@org1/msp/keystore/f4be32c6b1332d9b334fc10805e46f0074dacb1ac4123b23ff1daf9bf2041ef9_sk
45    signedCert:
46      path: artifacts/crypto-config/org1/users/Admin@org1/msp/admincerts/Admin@org1-cert.pem
47    peers:
48      - org1-peer0
49
50
51
52certificateAuthorities:
53
54  ca.org-orderer:
55    url: http://org-orderer-rootca:7053
56    httpOptions:
57      verify: false
58    tlsCACerts:
59      path: artifacts/crypto-config/org-orderer/tlsca/tlsca.org-orderer-cert.pem
60
61  ca.org1:
62    url: http://org1-rootca:7054
63    httpOptions:
64      verify: false
65    tlsCACerts:
66      path: artifacts/crypto-config/org-orderer/tlsca/tlsca.org-orderer-cert.pem
67
68
69orderers:
70
71  orderer0:
72    url: grpcs://106.12.60.245:7050
73    grpcOptions:
74      ssl-target-name-override: orderer0
75      allow-insecure: 0
76    tlsCACerts:
77      path: artifacts/crypto-config/org-orderer/tlsca/tlsca.org-orderer-cert.pem
78
79
80peers:
81
82  org1-peer0:
83    url: grpcs://106.12.60.243:7051
84    grpcOptions:
85      ssl-target-name-override: org1-peer0
86    tlsCACerts:
87      path: artifacts/crypto-config/org1/tlsca/tlsca.org1-cert.pem
88
89
90channels:
91  nml-channel:
92    orderers:
93      - orderer0
94
95    peers:
96      org1-peer0:
97        endorsingPeer: true
98        chaincodeQuery: true
99        ledgerQuery: true
100        eventSource: true
101
102    policies:
103      queryChannelConfig:
104        minResponses: 1
105        maxTargets: 1
106        retryOpts:
107          attempts: 5
108          initialBackoff: 500ms
109          maxBackoff: 5s
110          backoffFactor: 2.0
后端服务启动
服务端文件的目录结构为:
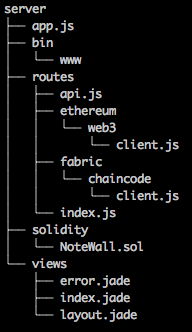
服务启动时会默认展示主页,具体代码如下:
1/**
2 * @file index js file
3 * @author BaaS Team
4 */
5var express = require('express');
6var router = express.Router();
7
8// GET home page
9router.get('/', function (req, res, next) {
10    res.render('index', {
11        title: 'Express'
12    });
13});
14
15module.exports = router;
除此之外,后端服务启动时会构建NoteWallFabricClient对象,并定义路由,具体代码如下:
1/**
2 * @file /api handler
3 * @author BaaS Team
4 */
5const express = require('express');
6const NoteWallWeb3Client = require('./ethereum/web3/client.js');
7const NoteWallFabricClient = require('./fabric/chaincode/client');
8const router = express.Router();
9
10let mode = process.env.BLOCKCHAIN_TYPE.toUpperCase();
11let blockchainClient;
12if (mode === 'ETHEREUM') {
13    let httpProvider = process.env.HTTP_PROVIDER;
14    if (!httpProvider) {
15        console.error('HTTP_PROVIDER not defined');
16        process.exit(1);
17    }
18    let contractAddress = process.env.CONTRACT_ADDRESS;
19    if (!contractAddress) {
20        console.error('CONTRACT_ADDRESS not defined');
21        process.exit(1);
22    }
23    let senderAddress = process.env.SENDER_ADDRESS;
24    if (!senderAddress) {
25        console.error('SENDER_ADDRESS not defined');
26        process.exit(1);
27    }
28    let senderPrivateKey = process.env.SENDER_PRIVATE_KEY;
29    if (!senderPrivateKey) {
30        console.error('SENDER_PRIVATE_KEY not defined');
31        process.exit(1);
32    }
33    blockchainClient = new NoteWallWeb3Client(httpProvider, contractAddress, senderAddress, senderPrivateKey);
34}
35else if (mode === 'FABRIC') {
36    let networkConfigPath = process.env.FABRIC_NETWORK_CONFIG_PATH;
37    if (!networkConfigPath) {
38        console.error('FABRIC_NETWORK_CONFIG_PATH not defined');
39        process.exit(1);
40    }
41    let channelName = process.env.FABRIC_CHANNEL_NAME;
42    if (!channelName) {
43        console.error('FABRIC_CHANNEL_NAME not defined');
44        process.exit(1);
45    }
46    let chaincodeName = process.env.FABRIC_CHAINCODE_NAME;
47    if (!chaincodeName) {
48        console.error('FABRIC_CHAINCODE_NAME not defined');
49        process.exit(1);
50    }
51    blockchainClient = new NoteWallFabricClient(networkConfigPath, channelName, chaincodeName);
52}
53else {
54    console.error('BLOCKCHAIN_TYPE not valid. ETHEREUM or FABRIC');
55}
56
57router.route('/note').post((req, res, next) => {
58    let id = req.body.id;
59    let title = req.body.title;
60    let content = req.body.content;
61    console.log(`${id} ${title} ${content}`);
62    // update
63    if (id) {
64        blockchainClient.updateNote(id, title, content, (err, receipt) => {
65            if (!err) {
66                res.json({status: 0, message: 'ok'});
67            }
68            else {
69                res.json({status: 1, message: err});
70            }
71        });
72    }
73    // insert
74    else {
75        blockchainClient.insertNote(title, content, (err, receipt) => {
76            if (!err) {
77                res.json({status: 0, message: 'ok'});
78            }
79            else {
80                res.json({status: 1, message: err});
81            }
82        });
83    }
84});
85
86router.get('/notes', (req, res, next) => {
87    blockchainClient.getAllNotes(notes => {
88        res.json({status: 0, message: notes});
89    });
90});
91
92module.exports = router;
Client构造
我们将这些交互抽象到一个NoteWallFabricClient中,在routes目录中创建fabric/chaincode子目录,并在chaincode目录下创建client.js文件。 新建一个NoteWallFabricClient类
1class NoteWallFabricClient {
2    constructor(networkConfigPath, channelName, chaincodeName) {
3        let client = fabricClient.loadFromConfig(networkConfigPath);
4        client.initCredentialStores();
5        let channel = client.getChannel(channelName);
6        this.client = client;
7        this.channel = channel;
8        this.chaincodeName = chaincodeName;
9    }
10}
11
12module.exports = NoteWallFabricClient;
构造函数通过Fabric网络配置文件构建了一个Client,实际使用时需要根据用户自身网络信息配置该文件。然后从client对象中获取channel对象,并将chaincode名称保存。
交易类方法调用
这里我们先实现创建note交易的方法。
1    /**
2     * @param title {string} 便签标题
3     * @param content {string} 便签正文
4     * @param callback {function} 回调函数
5     */
6    async insertNote(title, content, callback) {
7        // note id由当前时间戳生成,用户可以强化此处id生成方法
8        let id = + new Date();
9        // 用于标识是否发向所有peer的交易提案成功
10        let allGood = true;
11        let errorMessage = null;
12
13        try {
14            let txId = this.client.newTransactionID(true);
15
16            // 构建交易请求
17            let request = {
18                chaincodeId: this.chaincodeName,
19                fcn: 'insert',
20                args: [id.toString(), title, content],
21                txId: txId
22            };
23
24            // 发送交易提案,也即背书
25            let results = await this.channel.sendTransactionProposal(request, true);
26            let proposalResponses = results[0];
27            let proposal = results[1];
28
29            // 处理所有peer的返回
30            for (const i in proposalResponses) {
31                if (proposalResponses[i] instanceof Error) {
32                    allGood = false;
33                    errorMessage = util.format('invoke chaincode proposal resulted in an error :: %s',
34                        proposalResponses[i].toString());
35                    console.log(errorMessage);
36                } else if (proposalResponses[i].response && proposalResponses[i].response.status === 200) {
37                    console.info('invoke chaincode proposal was good');
38                } else {
39                    allGood = false;
40                    errorMessage = util.format('invoke chaincode proposal failed for an unknown reason %j',
41                        proposalResponses[i]);
42                    console.log(errorMessage);
43                }
44            }
45
46            // 如果返回都成功,将交易提交给orderer
47            if (allGood) {
48                const promises = [];
49                let eventHubs = await this.channel.getChannelEventHubsForOrg();
50                eventHubs.forEach(eh => {
51                    console.log('invokeEventPromise - setting up event:' + eh.getName());
52                    let invokeEventPromise = new Promise((resolve, reject) => {
53                        let eventTimeout = setTimeout(() => {
54                            let message = 'REQUEST_TIMEOUT:' + eh.getPeerAddr();
55                            console.log(message);
56                            eh.disconnect();
57                        }, 3000);
58                        eh.registerTxEvent(txId.getTransactionID(), (tx, code, blockNum) => {
59                                console.log('The chaincode invoke chaincode transaction has been committed on peer %s',
60                                    eh.getPeerAddr());
61                                console.log('Transaction %s has status of %s in blocl %s', tx, code, blockNum);
62                                clearTimeout(eventTimeout);
63
64                                if (code !== 'VALID') {
65                                    let message = util.format('The invoke chaincode transaction was invalid, code:%s',
66                                        code);
67                                    console.log(message);
68                                    reject(new Error(message));
69                                } else {
70                                    let message = 'The invoke chaincode transaction was valid.';
71                                    console.log(message);
72                                    resolve(message);
73                                }
74                            }, err => {
75                                clearTimeout(eventTimeout);
76                                console.log('err:' + err);
77                                reject(err);
78                            },
79                            // the default for 'unregister' is true for transaction listeners
80                            // so no real need to set here, however for 'disconnect'
81                            // the default is false as most event hubs are long running
82                            // in this use case we are using it only once
83                            {unregister: true, disconnect: true}
84                        );
85                        eh.connect();
86                    });
87                    promises.push(invokeEventPromise);
88                });
89                const ordererRequest = {
90                    txId: txId,
91                    proposalResponses: proposalResponses,
92                    proposal: proposal
93                };
94                const sendPromise = this.channel.sendTransaction(ordererRequest);
95
96                promises.push(sendPromise);
97                let results = await Promise.all(promises);
98                let response = results.pop();
99                if (response.status === 'SUCCESS') {
100                    console.log('Successfully sent transaction to the orderer.');
101                } else {
102                    errorMessage = util.format('Failed to order the transaction. Error code: %s', response.status);
103                    console.log(errorMessage);
104                }
105
106                // 监控event hubs结果
107                for (let i in results) {
108                    let eventHubResult = results[i];
109                    let eventHub = eventHubs[i];
110                    console.log('Event results for event hub :%s', eventHub.getPeerAddr());
111                    if (typeof eventHubResult === 'string') {
112                        console.log(eventHubResult);
113                    } else {
114                        if (!errorMessage) {
115                            errorMessage = eventHubResult.toString();
116                        }
117                        console.log(eventHubResult.toString());
118                    }
119                }
120
121            }
122        } catch (error) {
123            console.error('Failed to invoke due to error: ' + error.stack ? error.stack : error);
124            errorMessage = error.toString();
125        }
126        return callback(errorMessage, null);
127    }
更新note的方法和新建note的方法基本一致,唯一的区别就是将链码函数从insert改为update。
非交易类方法调用
非交易类方法主要为view类型的合约方法,可以直接查询而不用生成区块。具体代码如下:
1	/**
2	 * callback的参数为notes
3	 * notes格式为map[noteId] {
4	 *     id {int}
5	 *     title {string}
6	 *     content {string}
7	 * }
8	 */
9    async getAllNotes(callback) {
10        let request = {
11            chaincodeId: this.chaincodeName,
12            fcn: 'queryAll',
13            args: ['']
14        };
15        let queryResponses = await this.channel.queryByChaincode(request, true);
16        console.log('Query has completed, checking results:' + (queryResponses));
17        return callback(JSON.parse(queryResponses.toString('utf8')));
18    }
到此,与合约交互部分的逻辑都已经开发完成了。NoteWallFabricClient向外暴露三个方法分别是getAllNotes、insertNote、updateNote。
页面开发
开发页面前,我们首先将页面交互元素做一个拆分。主要的交互模块有
- 便签,每一个便签样式类似,但内容不同,一个便签对应合约存储中的一个便签实例;
- 便签板,上面挂载所有的便签元素,并控制其他模块是否渲染;
- 编辑器,编辑器用来给用户创建和更新便签时写入内容用。应该允许用户输入标题、内容;
客户端文件目录结构为:
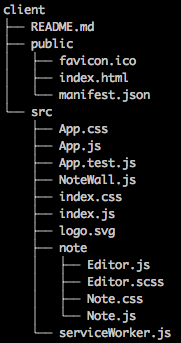
主页
主页比较简单,主要内容是定义了主渲染区”root“,代码如下
1<!DOCTYPE html>
2<html lang="en">
3<head>
4    <meta charset="utf-8">
5    <title>React App</title>
6    <link rel="shortcut icon" href="public/favicon.ico">
7    <meta name="viewport" content="width=device-width, initial-scale=1,
8    shrink-to-fit=no">
9    <meta name="theme-color" content="#000000">
10    <!--
11      manifest.json provides metadata used when your web app is added to the
12      homescreen on Android. See https://developers.google.com/web/fundamentals/web-app-manifest/
13    -->
14    <link rel="manifest" href="%PUBLIC_URL%/manifest.json">
15    <!--
16      Notice the use of %PUBLIC_URL% in the tags above.
17      It will be replaced with the URL of the `public` folder during the build.
18      Only files inside the `public` folder can be referenced from the HTML.
19
20      Unlike "/favicon.ico" or "favicon.ico", "%PUBLIC_URL%/favicon.ico" will
21      work correctly both with client-side routing and a non-root public URL.
22      Learn how to configure a non-root public URL by running `npm run build`.
23    -->
24    <meta http-equiv="X-UA-Compatible" content="IE=Edge">
25</head>
26<body>
27    <noscript>
28        You need to enable JavaScript to run this app.
29    </noscript>
30    <div id="root"></div>
31    <!--
32      This HTML file is a template.
33      If you open it directly in the browser, you will see an empty page.
34
35      You can add webfonts, meta tags, or analytics to this file.
36      The build step will place the bundled scripts into the <body> tag.
37
38      To begin the development, run `npm start` or `yarn start`.
39      To create a production bundle, use `npm run build` or `yarn build`.
40    -->
41</body>
42</html>
主页默认渲染便签板,代码如下:
1/**
2 * @file client index
3 * @author BaaS Team
4 */
5import React from 'react';
6import ReactDOM from 'react-dom';
7import './index.css';
8import App from './App';
9import * as serviceWorker from './serviceWorker';
10
11ReactDOM.render(<App />, document.getElementById('root'));
12
13// If you want your app to work offline and load faster, you can change
14// unregister() to register() below. Note this comes with some pitfalls.
15// Learn more about service workers: http://bit.ly/CRA-PWA
16serviceWorker.unregister();
index样式控制表:
1body {
2    margin: 0;
3    padding: 0;
4    font-family: -apple-system, BlinkMacSystemFont, "Segoe UI", "Roboto", "Oxygen",
5    "Ubuntu", "Cantarell", "Fira Sans", "Droid Sans", "Helvetica Neue",
6    sans-serif;
7
8    -webkit-font-smoothing: antialiased;
9    -moz-osx-font-smoothing: grayscale;
10}
11
12code {
13    font-family: source-code-pro, Menlo, Monaco, Consolas, "Courier New",
14    monospace;
15}
index中渲染了APP对象,渲染代码如下:
1/**
2 * @file app component
3 * @author BCE BaaS Team
4 */
5
6import React, {Component} from 'react';
7import './App.css';
8import NoteWall from './NoteWall';
9
10export default class App extends Component {
11    render() {
12        return (
13            <div className="App">
14                <header className="App-header">
15                    <NoteWall />
16                </header>
17            </div>
18        );
19    }
20}
APP样式控制表:
1.App {
2    text-align: center;
3}
4
5.App-logo {
6    height: 40vmin;
7    animation: App-logo-spin infinite 20s linear;
8}
9
10.App-header {
11    display: flex;
12    flex-direction: column;
13    min-height: 100vh;
14    font-size: calc(10px + 2vmin);
15    color: #fff;
16    background-color: #282c34;
17
18    align-items: center;
19    justify-content: center;
20}
21
22.App-link {
23    color: #61dafb;
24}
25
26@keyframes App-logo-spin {
27    from {
28        transform: rotate(0deg);
29    }
30    to {
31        transform: rotate(360deg);
32    }
33}
便签
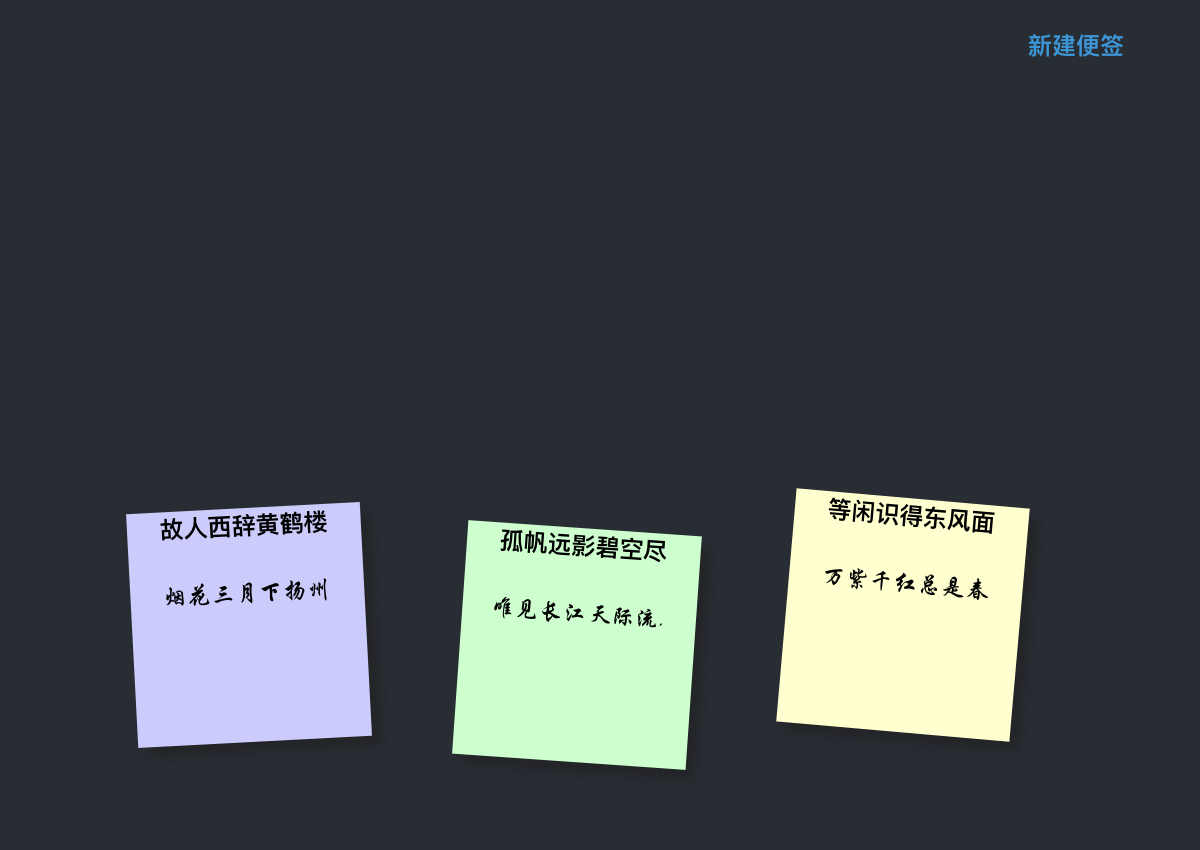
便签模块主要是在样式控制上,这里我们将便签设计成不同颜色区分,会有不同倾斜角的正方形卡片。标题文字加粗。如效果图:

Note元素组件定义
1/**
2 * @file note component
3 * @author BaaS Team
4 */
5import React, {Component} from 'react';
6import './Note.css';
7
8export default class Note extends Component {
9    render() {
10        const {id, title, content} = this.props;
11        return (
12            <div className="note" onClick={() =>
13                this.props.onClick(id, title, content)}>
14                <div className="note-panel">
15                    <h2>{this.props.title}</h2>
16                    <p>{this.props.content}</p>
17                </div>
18            </div>
19        );
20    }
21}
样式控制代码:
1* {
2    margin: 0;
3    padding: 0;
4}
5
6body {
7    margin: 1em;
8    font-family: arial, sans-serif;
9    font-size: 100%;
10    color: #fff;
11    background: #666;
12}
13
14h2,
15p {
16    font-size: 100%;
17    font-weight: 400;
18}
19
20.note-wall,
21.note {
22    list-style: none;
23}
24
25.note-wall {
26    overflow: hidden;
27    padding: 3em;
28}
29
30.note-panel {
31    display: block;
32    width: 5em;
33    height: 5em;
34    padding: 2px;
35    text-decoration: none;
36    color: #000;
37    background: #ffc;
38    -webkit-box-shadow: 5px 5px 7px rgba(33, 33, 33, .7);
39       -moz-box-shadow: 5px 5px 7px rgba(33, 33, 33, 1);
40            box-shadow: 5px 5px 7px rgba(33, 33, 33, .7);
41    -webkit-transition: -webkit-transform .15s linear;
42       -moz-transition:    -moz-transform .15s linear;
43         -o-transition:      -o-transform .15s linear;
44}
45
46.note {
47    float: left;
48    margin: 1em;
49}
50
51.note-panel h2 {
52    padding-bottom: 10px;
53    font-size: 20%;
54    font-weight: 700;
55}
56
57.note-panel p {
58    font-family: "Reenie Beanie", arial, sans-serif;
59    font-size: 20%;
60}
61
62.note-panel {
63    -webkit-transform: rotate(-6deg);
64       -moz-transform: rotate(-6deg);
65         -o-transform: rotate(-6deg);
66}
67
68.note-wall div:nth-child(even) .note-panel {
69    position: relative;
70    top: 5px;
71    background: #cfc;
72    -webkit-transform: rotate(4deg);
73       -moz-transform: rotate(4deg);
74         -o-transform: rotate(4deg);
75}
76
77.note-wall div:nth-child(3n) .note-panel {
78    position: relative;
79    top: -5px;
80    background: #ccf;
81    -webkit-transform: rotate(-3deg);
82       -moz-transform: rotate(-3deg);
83         -o-transform: rotate(-3deg);
84}
85
86.note-wall div:nth-child(5n) .note-panel {
87    position: relative;
88    top: -10px;
89    -webkit-transform: rotate(5deg);
90       -moz-transform: rotate(5deg);
91         -o-transform: rotate(5deg);
92}
93
94.note-panel:focus {
95    position: relative;
96    z-index: 5;
97    -webkit-box-shadow: 10px 10px 7px rgba(0, 0, 0, .7);
98       -moz-box-shadow: 10px 10px 7px rgba(0, 0, 0, .7);
99            box-shadow: 10px 10px 7px rgba(0, 0, 0, .7);
100    -webkit-transform: scale(1.25);
101       -moz-transform: scale(1.25);
102         -o-transform: scale(1.25);
103}
便签板
便签板组件负责挂载其余组件,并负责通过子组件的事件回调完成子组件的通信。主要有以下核心控制逻辑:
1/**
2 * @file notewall class. main component in app.
3 * @author BaaS Team
4 */
5import React, {Component} from 'react';
6import Note from './note/Note.js';
7import Editor from './note/Editor.js';
8
9export default class NoteWall extends Component {
10    constructor(props) {
11        super(props);
12        this.state = {
13            editorShow: false,
14            noteList: []
15        };
16        this.showEditor = this.showEditor.bind(this);
17        this.closeEditor = this.closeEditor.bind(this);
18        this.periodicGetList = this.periodicGetList.bind(this);
19    }
20
21    showEditor(id, title, content) {
22        this.setState({
23            editorShow: !this.state.editorShow,
24            id: id,
25            title: title,
26            content: content
27        });
28    }
29
30    closeEditor() {
31        this.setState({
32            editorShow: false
33        }, () => {
34            this.getList();
35        });
36    }
37
38    // Fetch the list on first mount
39    componentWillMount() {
40        this.getList();
41        this.periodicGetList();
42    }
43
44    periodicGetList() {
45        setTimeout(
46            function () {
47                this.getList();
48                this.periodicGetList();
49            }
50            .bind(this),
51            3000
52        );
53    }
54
55    // Retrieves the list of items from the Express app
56    getList() {
57        fetch('/api/notes')
58            .then(res => res.json())
59            .then(res => this.setState({noteList: res.message}));
60    }
61
62    render() {
63        let list = this.state.noteList;
64        return (
65            <div className="note-wall">
66                <button className="btn header-btn" onClick={e => {
67                            this.showEditor(null, '', '');
68                        }
69                    }>新建</button>
70                {
71                    Object.keys(list).map(noteId => {
72                        let note = list[noteId];
73                        return (
74                            <Note key={note.id} id={note.id} title={note.title}
75                            content={note.content} onClick={this.showEditor} />
76                        );
77                    })
78                }
79
80                <Editor show={this.state.editorShow} id={this.state.id} title={this.state.title}
81                 content={this.state.content} onClick={this.showEditor} closeEditor={this.closeEditor} />
82            </div>
83        );
84    }
85}
便签板完成后,效果图如下:
编辑器
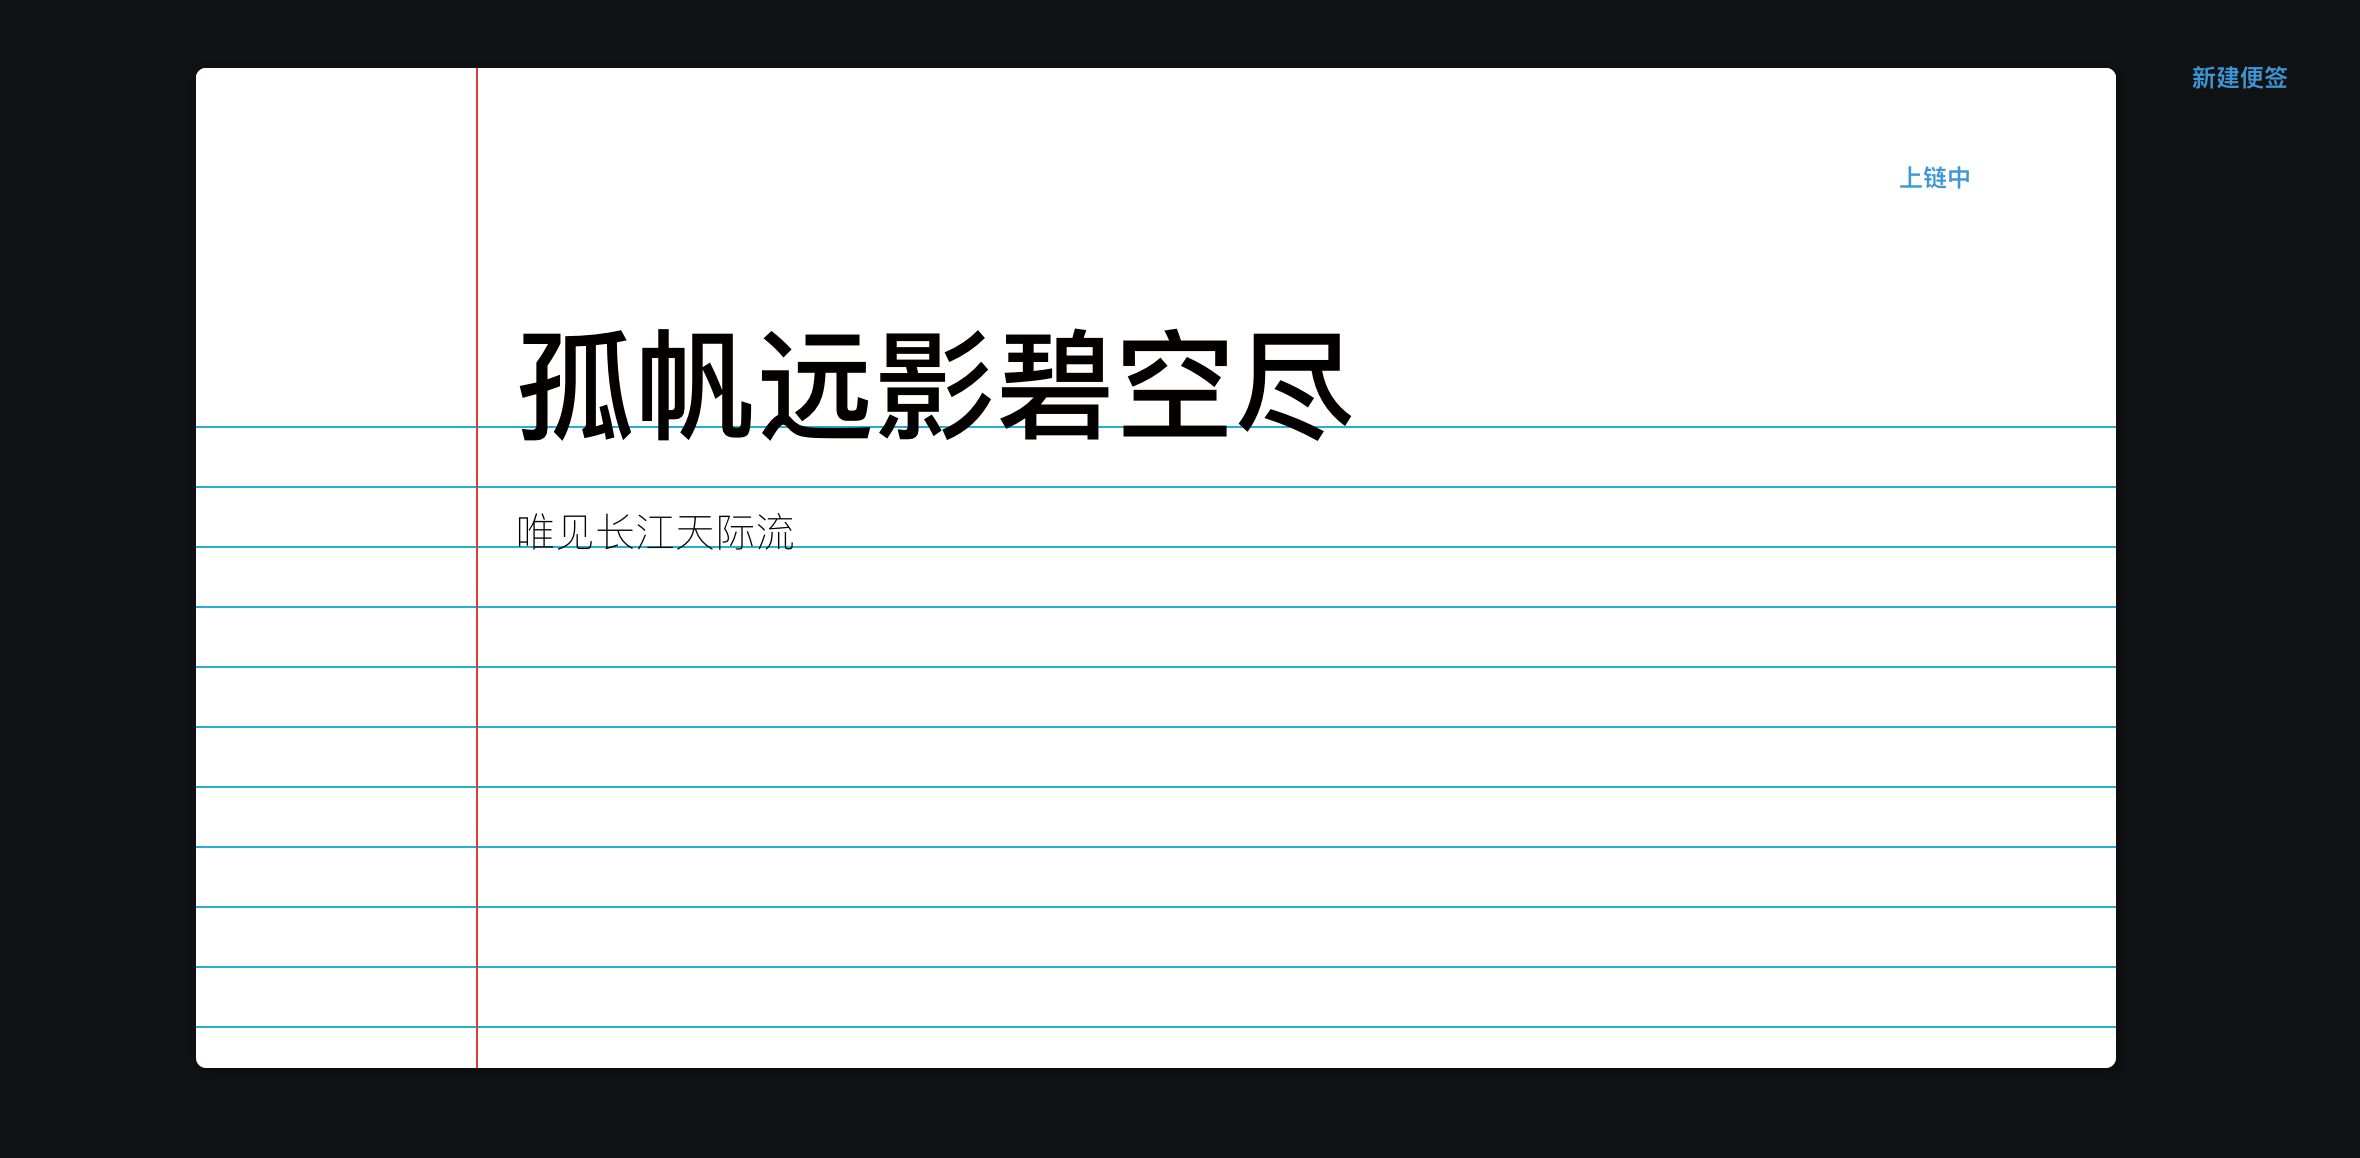
编辑器本身需要完成四个功能:
- 如果是已有便签更新,那么需要显示便签标题、便签正文;
- 右上角需要有一个“上链”的按钮,用户更新完成后可以点击这个按钮完成便签存入;
- 当便签上链交易完成后,编辑器退出;
- 当用户放弃编辑时,点击编辑器外即可退出编辑。
编辑Editor.js,代码如下
1/**
2 * @file editor component
3 * @author BaaS Team
4 */
5import React, {Component} from 'react';
6import './Editor.scss';
7
8const titleRef = React.createRef();
9const contentRef = React.createRef();
10
11export default class Editor extends Component {
12    constructor(props) {
13        super(props);
14        this.saveNote = this.saveNote.bind(this);
15    }
16
17    saveNote() {
18        fetch('/api/note', {
19            method: 'POST',
20            headers: {
21                'Content-Type': 'application/json'
22            },
23            body: JSON.stringify({
24                id: this.props.id,
25                title: titleRef.current.innerText,
26                content: contentRef.current.innerText
27            })
28        })
29            .then(res => {
30                res.json();
31            })
32            .then(list => this.setState({
33                noteList: list
34            }, () => this.props.closeEditor()));
35    }
36
37    render() {
38        return (
39            <div className={this.props.show ? 'editor display-block' : 'editor display-none'}
40            onClick={() => this.props.onClick(this.props.title, this.props.content)}>
41                <div id="notebook-paper" onClick={e => {
42                    e.stopPropagation();
43                }
44            }>
45                    <header>
46                        <h1 id="title-text" contentEditable="true" suppressContentEditableWarning={true}
47                         ref={titleRef}>{this.props.title}</h1>
48                        <button className="btn header-btn" onClick={this.saveNote}>保存</button>
49                    </header>
50                    <div id="content">
51                        <div id="content-text" contentEditable="true"
52                         suppressContentEditableWarning={true} ref={contentRef}>
53                            {this.props.content}
54                        </div>
55                    </div>
56                </div>
57            </div>
58            );
59    }
60}
Editor的样式表:
1.editor {
2  position: fixed;
3  top: 0;
4  left: 0;
5  width:100%;
6  height: 100%;
7  background: rgba(0, 0, 0, 0.6);
8}
9
10.editor-main {
11  position:fixed;
12  background: white;
13  width: 80%;
14  height: auto;
15  top:50%;
16  left:50%;
17  transform: translate(-50%,-50%);
18}
19
20.display-block {
21  display: block;
22}
23
24.display-none {
25  display: none;
26}
27
28* {
29  -webkit-box-sizing:border-box;
30  -moz-box-sizing:border-box;
31  -ms-box-sizing:border-box;
32  -o-box-sizing:border-box;
33  box-sizing:border-box;
34}
35
36body {
37  background: #f1f1f1;
38  font-family:helvetica neue, helvetica, arial, sans-serif;
39  font-weight:200;
40}
41
42#notebook-paper {
43  text-align: left;
44  color: #050000;
45  width:960px;
46  height:500px;
47  background: linear-gradient(to bottom,white 29px,#00b0d7 1px);
48  margin:50px auto;
49  background-size: 100% 30px;
50  position:relative;
51  padding-top:150px;
52  padding-left:160px;
53  padding-right:20px;
54  overflow:hidden;
55  border-radius:5px;
56  -webkit-box-shadow:3px 3px 3px rgba(0,0,0,.2),0px 0px 6px rgba(0,0,0,.2);
57  -moz-box-shadow:3px 3px 3px rgba(0,0,0,.2),0px 0px 6px rgba(0,0,0,.2);
58  -ms-box-shadow:3px 3px 3px rgba(0,0,0,.2),0px 0px 6px rgba(0,0,0,.2);
59  -o-box-shadow:3px 3px 3px rgba(0,0,0,.2),0px 0px 6px rgba(0,0,0,.2);
60  box-shadow:3px 3px 3px rgba(0,0,0,.2),0px 0px 6px rgba(0,0,0,.2);
61  &:before {
62    content:'';
63    display:block;
64    position:absolute;
65    z-index:1;
66    top:0;
67    left:140px;
68    height:100%;
69    width:1px;
70    background:#db4034;
71  }
72  header {
73    height:150px;
74    width:100%;
75    background:white;
76    position:absolute;
77    top:0;
78    left:0;
79    h1 {
80      font-size:60px;
81      line-height:60px;
82      padding:127px 20px 0 160px;
83    }
84  }
85  #content {
86    margin-top:67px;
87    font-size:20px;
88    line-height:30px;
89  }
90
91  #hipsum {
92    margin:0 0 30px 0;
93  }
94}
95
96//Colours
97$green: #2ecc71;
98$red: #e74c3c;
99$blue: #3498db;
100$yellow: #f1c40f;
101$purple: #8e44ad;
102$turquoise: #1abc9c;
103
104// Basic Button Style
105.btn {
106  box-sizing: border-box;
107  appearance: none;
108  background-color: transparent;
109  border: 2px solid $red;
110  border-radius: 0.6em;
111  color: $red;
112  cursor: pointer;
113  display: block;
114  align-self: center;
115  font-size: 3px;
116  font-weight: 500;
117  line-height: 1;
118  margin: 20px;
119  padding: 5px 2px;
120  text-decoration: none;
121  text-align: center;
122  text-transform: uppercase;
123  font-family: 'Montserrat', sans-serif;
124  font-weight: 700;
125
126  &:hover,
127  &:focus {
128    color: #fff;
129    outline: 0;
130  }
131}
132
133.header-btn {
134  border-color: $purple;
135  // border: 0;
136  border-radius: 0;
137  color: $purple;
138  position: absolute;
139  top: 20px;
140  right: 20px;
141  width: 50px;
142  height: 30px;
143  overflow: hidden;
144  z-index: 1;
145  transition: color 150ms ease-in-out;
146
147  &:after {
148    content: '';
149    position: absolute;
150    display: block;
151    top: 0;
152    left: 50%;
153    transform: translateX(-50%);
154    width: 0;
155    height: 100%;
156    background: $purple;
157    z-index: -1;
158    transition: width 150ms ease-in-out;
159  }
160
161  &:hover {
162    color: #fff;
163    &:after {
164      width: 110%;
165    }
166  }
167}
实现完成后效果如下
编辑便签
到此Dapp应用层开发完毕,我们可以在本地手动测试一下创建便签、更新便签、退出编辑等功能。接下来我们准备将Dapp进行部署。
