配置中心接入
配置中心接入
准备工作
- 开发环境中下载 Maven 并完成环境配置。
- 开发环境中安装 JDK 1.8 并完成环境配置(目前项目仅支持 1.8)。
创建 demo 服务
1. 创建 config-demo 工程
创建一个 Maven 工程,命名为 config-demo,JDK 选择 1.8 版本。
2. 修改 pom 文件,添加 Spring Cloud 和配置中心客户端依赖
微服务支持 Spring boot 2.0.7.REALEASE 及以上版本和S pring Cloud Finchley.SR2 及以上版本。 这里以 Spring boot 2.0.7.REALEASE 和 Spring Cloud Finchley.SR2 为例。
<parent>
    <groupId>org.springframework.boot</groupId>
    <artifactId>spring-boot-starter-parent</artifactId>
    <version>2.0.7.RELEASE</version>
    <relativePath/>
</parent>

<dependencyManagement>
    <dependencies>
        <dependency>
            <groupId>org.springframework.cloud</groupId>
            <artifactId>spring-cloud-dependencies</artifactId>
            <version>Finchley.SR2</version>
            <type>pom</type>
            <scope>import</scope>
        </dependency>
    </dependencies>
</dependencyManagement>

<dependencies>
    <dependency>
        <groupId>org.springframework.boot</groupId>
        <artifactId>spring-boot-starter-web</artifactId>
    </dependency>

    <!--本地开发不需要此依赖-->
    <dependency>
    	<groupId>com.baidubce.formula</groupId>
    	<artifactId>env-core-spring-boot-starter</artifactId>
    	<version>${env-core-version}</version>
    </dependency>

    <dependency>
    	<groupId>com.baidubce.formula</groupId>
    	<artifactId>consul-config-spring-boot-starter</artifactId>
    	<version>${consul-config-version}</version>
    </dependency>
</dependencies>
${env-core-version} 与 ${consul-config-version} 为版本号,可自行从公共 Maven 仓库中查找使用最新版本。
3. 创建配置类,添加 @ConfigurationProperties 注解
热更新会对两类 Bean 进行刷新,一种是使用了 @ConfigurationProperties 的对象,另一类是使用了 @RefreshScope 的对象。两者的更新机制也不同,前者注释的 bean 通过重新绑定来完成刷新;后者是通过 RefreshScope 的缓存和延迟加载机制,摧毁旧对象,生成新对象。用户可以根据平时使用习惯或者具体场景,选择其一或者同时选择使用。本文将以 @ConfigurationProperties 为例,也是 Spring Cloud 官方推荐的动态配置使用方式。
另外,@Value 注释的属性在启动时也可以从配置中心获取配置值,但是该注解不能做到配置热更新。
@ConfigurationProperties(prefix = "test")
public class TestProperties {

    private String k0;

    private String k1;

    private String k2;

    // getters and setters

}
4. 创建简单的 Controller,包含一个获取配置类值的方法。
@RestController
@EnableConfigurationProperties(TestProperties.class)
public class EchoController {

 	@Autowired
    private TestProperties testProperties;

    @GetMapping("/getProperties")
    public ResponseEntity<Object> getConfigFromProperty() {
        return new ResponseEntity<>(testProperties, HttpStatus.OK);
    }
}
@EnableConfigurationProperties 与 @ConfigurationProperties 搭配使用。 @EnableConfigurationProperties(TestProperties.class) 也可注释在配置类或者启动类中。
5. 配置application.properties配置文件
在application.properties中添加如下配置,用于将服务注册到注册中心中。
# 服务名称
spring.application.name=config-demo
server.port=8888
# 配置类参数默认值
test.k0=0
test.k1=0
test.k2=0
说明:配置类参数默认值中的 test 为配置类的 prefix,建议为所有配置类参数在配置文件中设置默认值,这样在配置中心管理端删除相对应的配置时,应用程序将会恢复使用默认值,而不是停留在未删除的状态。
6. CNAP平台部署
6.1. 制作镜像
参考镜像制作文档
6.2. 使用 CNAP 平台进行部署
请参考 CNAP 操作指南中的应用托管部分。
6.3. 创建配置并进行验证
请参考 CNAP 操作指南微服务配置管理部分创建配置组。
通过为部署组创建的访问入口,调用 config-demo 应用的接口,观察返回值是否为创建的对应配置组的值(如创建多个作用域下的多个配置组,观察配置值是否按照优先级生效):
http://{ip}:{port}/getProperties。
本地开发与调试
1. 启动本地 Consul Server
-
根据开发机系统选择下载对应 Consul 启动包
- 参照 Consul 使用指南安装: https://learn.hashicorp.com/consul/getting-started/install
-
启动 Consul Agent:https://learn.hashicorp.com/consul/getting-started/agent
- 以开发模式启动:consul agent -dev (快速测试推荐方式)
- 持久化模式启动:consul agent -server -bootstrap-expect 1 -data-dir=/usr/local/consul/data/ -config-dir=/usr/local/consul/consul.d/
-
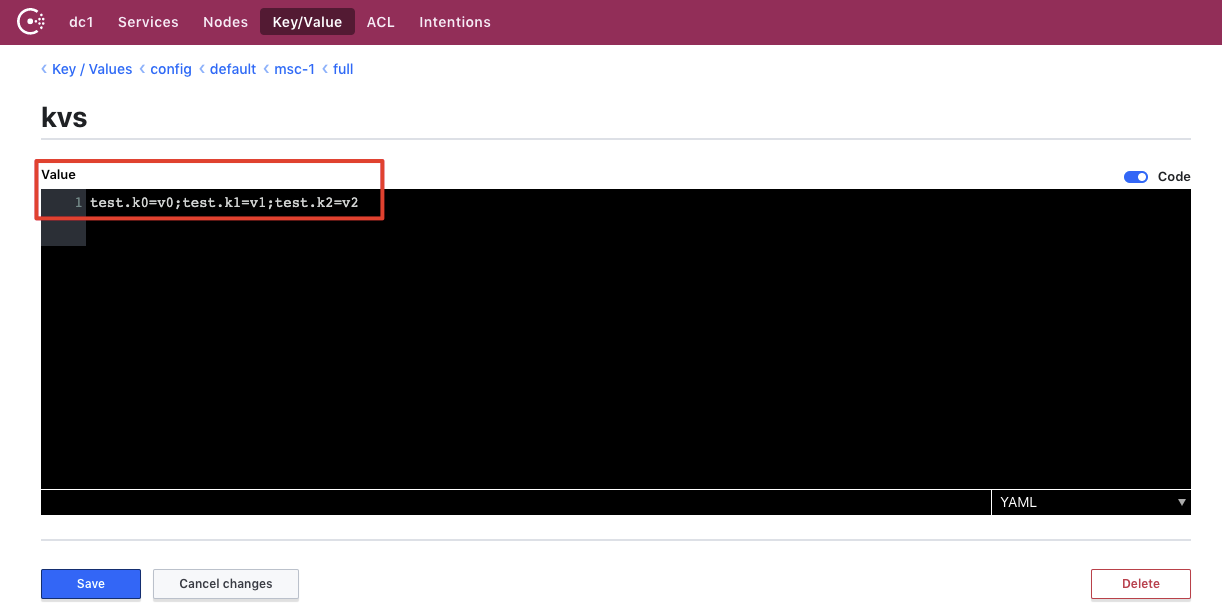
访问 http://localhost:8500/ui/dc1/kv , 点击 Create, 在 Key or folder 中输入 config/ , 然后点击 Save 保存; 成功后,点击进入 config 目录, 以同样的方式创建二级目录 default、三级目录 msc-1 (任意字符与数字组合)、四级目录 full,在四级目录 full 下面创建 key:kvs。
- 根据测试需要,可以在 key:kvs 对应的 value 里面输入 demo 应用相应的 Key/Value,以分号 ';' 作为分隔符。
- 例如: test.k1=v1;test.k2=v2;test.k3=v3
- 注意,上面 value 里面的 'test' 是程序中 @ConfigurationProperties 注解指定的 'prefix' 值。

2. 补充 bootstrap.properties 配置文件
在 bootstrap.properties(或 bootstrap.yml)中添加如下配置:
# 本地开发不支持consul访问token授权
spring.cloud.consul.config.token-enabled=false

# 以下均为默认配置,可根据实际测试需求调整:
spring.cloud.consul.host=localhost
spring.cloud.consul.port=8500
# default to true, set false to disable all consul config func.
spring.cloud.consul.config.enabled=true
# default to true, set false to disable watch config change (disable hot update).
spring.cloud.consul.config.watch.enabled=true
# default to 'config', this is the first directory.
spring.cloud.consul.config.prefix=config
# default value is 'default', this is one of the second directory, but with lowest priority.
spring.cloud.consul.config.default-context=default
若上一步的 Consul Server 是在本机启动,只需添加第一行配置即可快速启动测试:spring.cloud.consul.config.token-enabled=false
建议用户将以上配置添加在 bootstrap-local.properties 文件中,并在本地启动时指定 profiles 为 local,这样即可做到本地配置与线上配置互相隔离,每次本地开发测试也不用重复添加删除以上配置。
3. 更新 Maven 依赖
因本地开发,无需平台相关环境变量依赖,需要注释掉在创建 demo 服务步骤中添加的env-core-spring-boot-starter 依赖。
4. 本地 IDE 中启动
执行 config-demo 的 main 方法进行启动。
正常场景中程序会启动完毕,如遇到启动出错情况,建议在程序启动参数 Program arguement 中增加如下参数,用于打印更详细的输出信息:--logging.level.root=debug
5. FatJar 启动
5.1. maven 中配置打包插件
<build>
    <plugins>
        <plugin>
            <groupId>org.springframework.boot</groupId>
            <artifactId>spring-boot-maven-plugin</artifactId>
        </plugin>
    </plugins>
</build>
5.2. 打包 FatJar 文件
在 config-demo 的工程主路径下,使用 mvn clean package 进行打包,将在 target 目录下生成可执行的jar文件。
5.3. 通过 java 命令执行 FatJar
进入部署的 K8S POD 中,执行如下命令:java -jar config-demo-1.0-SNAPSHOT.jar
6. 服务验证
调用以下接口,观察调用返回是否为 Consul Server 中配置的值:http://localhost:8888/getProperties;
更新配置值,如:test.k1 = v1.1,再次调用该接口,观察返回值是否更新为最新配置值;
从 Consul Server 中删除对应的配置,如:test.k0,再次调用该接口,观察返回值是否更新为文件配置中的默认值。
微服务配置中心原理
微服务配置中心从架构上分为:客户端、服务端和管理端。
客户端由用户应用与配置中心SDK组成,配置在客户端生效。客户端在项目启动之初,向服务端发起短连接请求,用于拉取初始化配置。如果客户端开启了热更新功能(spring.cloud.consul.config.watch.enabled=true), 则客户端会在项目启动之后,向服务端发起长连接请求,用于监听配置变更。配置变更后,配置将在客户端准实时生效(生效时间 < 1s)。
配置热更新机制基于 Spring Cloud 框架实现,当前版本仅支持 @ConfigurationProperties 与 @RefreshScope 注解。
本地开发中启动的 Consul Server 即为服务端,提供配置KV存储,并且处理客户端发起的请求。
CNAP 平台提供了高可用高性能的 Consul Server 集群作为服务端,并且基于 PaaS 平台与环境以及配置中心提供的一系列高级功能,提供了配置中心管理端 UI。基于配置中心管理端,可以配置不同优先级的配置组,优先级生效顺序为:部署组 > 环境 > 应用 > 工作空间。
注意:若为相同作用域上线了多个配置组,例如 msc-1 与 msc-2 的作用域均为部署组,生效对象均为 部署组 = dg-1,且这两个配置组中的配置 key 有重复,则不能保证哪个配置组的 key 生效。因此,建议用户对配置组进行分类,一个配置组放一类配置,避免同作用域下配置组的 key 重复。
